

Last Updated on February 20, 2023 by cscontents
Introduction
Java is an object-oriented programming language. Using java we can develop mobile application, web application, enterprise application, normal Java application etc. Tech companies use Java to develop various software (e.g., web servers).
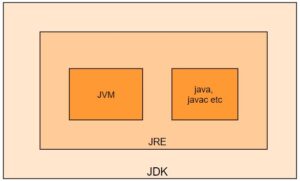
When it comes to running all those Java based applications, they require Java to be installed as a prerequisite. And when we install java on any machine, we don’t install only Java. We install Java Development Kit (JDK). Inside JDK, we have JRE (Java Runtime Environment) and inside JRE we have JVM (Java Virtual Machine).
In this article we will see Java installation on Ubuntu, RHEL, CentOS.
For any Linux OS, Java can be installed in multiple ways.
- Using package manager – in this case we use the package manager (e.g., apt, yum etc.)
- Using archive – in this case we need to download the required JDK binaries file and then install it.
Java installation on Ubuntu
Here we will see Java installation on Ubuntu in both way (package manager & archive method).
Java installation on Ubuntu using Package Manager
For ubuntu the package manager is apt.
Java installation
To install Java run the below commands.
Step 1 : Update your OS
sudo apt update
Step 2: Install JDK
Based on your requirement you can install JDK 8 or JDK 11. To install JDK 8, run below command.
sudo apt install openjdk-8-jdk
To install JDK 11, run below command.
sudo apt install openjdk-11-jdk
Step 3: Check Java version
java –version
Set JAVA_HOME variable
Follow the below steps to set JAVA_HOME environment variable.
Step 1: Check all the installed Java
Run the below command which will show the Java installation path.
sudo update-alternatives --config java
Step 2: Edit the /etc/environment file
From the output of above command copy the installation path up to bin (don’t include the /bin). Now open the /etc/environment file
sudo vi /etc/environment
Now enter the below lines (edit YOUR_COPIED_PATH section)
JAVA_HOME="YOUR_COPIED_PATH"

PATH=$PATH:$JAVA_HOME/bin
For example: JAVA_HOME="/usr/lib/jvm/java-8-openjdk-amd64"
Finally, save the file.
Step 3: Reload the /etc/environment file
Run the below command to reload the file.
source /etc/environment
Step 4: Verify JAVA_HOME variable
To verify JAVA_HOME variable, run the below command.
echo $JAVA_HOME
The above command should show your JDK installation path.
Note: If you want to execute any script (via SSH) which requires JAVA_HOME env variable on the machine then you might need to set the JAVA_HOME & PATH variable in the /etc/profile file. You need to add the below lines in /etc/profile file.
export JAVA_HOME="/usr/lib/jvm/java-8-openjdk-amd64"
export PATH=$PATH:$JAVA_HOME/bin
After that you need to reload the /etc/profile file by running the below command.
source /etc/profile
Java installation on Ubuntu using Archive
Follow the below steps to install Java using archive.
Step 1: Download JDK binaries
Run the below command to download the JDK binaries file. We will download it in /opt directory.
cd /opt/
curl https://download.java.net/java/GA/jdk18.0.2.1/db379da656dc47308e138f21b33976fa/1/GPL/openjdk-18.0.2.1_linux-x64_bin.tar.gz -o openjdk-18.0.2.1_linux-x64_bin.tar.gz
Step 2: Unzip the binary file
Run the below command to unzip.
tar -xvf openjdk-18.0.2.1_linux-x64_bin.tar.gz
Step 3: Set the JAVA_HOME in /etc/environment file
We have the jdk-18.0.2.1/ directory under /opt.
So, our JAVA_HOME path will be /opt/jdk-18.0.2.1/, we need to set this path in /etc/environment file. Run the below command.
sudo vi /etc/environment
Now enter the below lines,
JAVA_HOME="/opt/jdk-18.0.2.1"
PATH=$PATH:$JAVA_HOME/bin
Finally, save the file.
Step 4: Reload the /etc/environment file
Run the below command to reload the file.
source /etc/environment
Step 5: Verify JAVA_HOME variable
To verify JAVA_HOME variable, run the below command.
echo $JAVA_HOME
The above command should show your JDK installation path.
Note: If you want to execute any script (via SSH) which requires JAVA_HOME env variable on the machine then you might need to set the JAVA_HOME & PATH variable in the /etc/profile file. You need to add the below lines in /etc/profile file.
export JAVA_HOME="/opt/jdk-18.0.2.1"
export PATH=$PATH:$JAVA_HOME/bin
After that you need to reload the /etc/profile file by running the below command.
source /etc/profile
Step 6: Check Java version
Run the below command to check java version.
java -version
Java installation on RHEL & CentOS
Here we will see Java installation on RHEL & CentOS in both way (package manager & archive method). Since RHEL & CentOS has same package manager, so you can follow same instruction for RHEL & CentOS.
Java installation on RHEL & CentOS using Package Manager
For RHEL & CentOS, package manager is yum.
Java installation
To install Java run the below commands.
Step 1 : Update your OS
sudo apt update
Step 2: Install JDK
Based on your requirement you can install JDK 8 or JDK 11. To install JDK 8, run below command.
sudo yum install java-1.8.0-openjdk
To install JDK 11, run below command.
sudo yum install java-11-openjdk
Step 3: Check Java version
java –version
Set JAVA_HOME variable
Follow the below steps to set JAVA_HOME environment variable.
Step 1: Check all the installed Java
Run the below command which will show the Java installation path.
sudo update-alternatives --config java
Step 2: Edit the /etc/environment file
From the output of above command copy the installation path up to bin (don’t include the /bin). Now open the /etc/environment file
sudo vi /etc/environment
Now enter the below line (edit YOUR_COPIED_PATH section)
JAVA_HOME="YOUR_COPIED_PATH"

PATH=$PATH:$JAVA_HOME/bin
For example: JAVA_HOME="/usr/lib/jvm/java-11-openjdk-11.0.18.0.10-1.el8_6.x86_64"
Finally, save the file.
Step 3: Reload the /etc/environment file
Run the below command to reload the file.
source /etc/environment
Step 4: Verify JAVA_HOME variable
To verify JAVA_HOME variable, run the below command.
echo $JAVA_HOME
The above command should show your JDK installation path.
Note: If you want to execute any script (via SSH) which requires JAVA_HOME env variable on the machine then you might need to set the JAVA_HOME & PATH variable in the /etc/profile file. You need to add the below lines in /etc/profile file.
export JAVA_HOME="/usr/lib/jvm/java-11-openjdk-11.0.18.0.10-1.el8_6.x86_64"

export PATH=$PATH:$JAVA_HOME/bin
After that you need to reload the /etc/profile file by running the below command.
source /etc/profile
Java installation on RHEL & CentOS using Archive
Please follow the below link to install Java using archive installation.
Thank You.
If you are interested in learning DevOps, please have a look at the below articles, which will help you greatly.
- How to create ansible role for Java installation – a simple guide
- Kubernetes Series: Part 1 – Introduction to Kubernetes | Background of Kubernetes
- Kubernetes Series: Part 2 – Components of Kubernetes cluster | Kubernetes cluster in detail
- Kubernetes Series: Part 3 – What is Minikube and How to create a Kubernetes cluster (on Linux) using Minikube?
- Introduction to Ansible | High Level Understanding of Ansible
- Basics of automation using Ansible | Automate any task
- 10 frequently used ansible modules with example
- Jenkins Pipeline as code – High level information
- What is End-to-End Monitoring of any web application and Why do we need it?
- What is “Monitoring” in DevOps? Why do we need to Monitor App/DB servers, Transactions etc.?
- DevOps Engineer or Software Developer Engineer which is better for you?- Let’s discuss
- How To Be A Good DevOps Engineer?
- How to do git push, git pull, git add, git commit etc. with Bitbucket