

Last Updated on February 2, 2023 by cscontents
Introduction
In this article we will see how to create an ansible role which will automate the installation of Java on Linux as well as we will be able to reuse it.
So, if you are looking for a step-by-step guide to create an ansible role then you are in right place. We will try to keep the process simple so that it is easily understandable. Once you understand it you can customize it as you wish. Also, if you have the playbook which install Java, and now you want to convert it to an ansible role, then also this article will help you.
Before starting if you want to learn about the basics of ansible role then we suggest you go through the below article.
Prerequisite
You will need to below to complete this tutorial –
Prerequisite Knowledge
- Hands-on knowledge on ansible
- Knowledge on Java installation
- Basic Linux commands
If you want to learn Ansible basics then please check out the below course from KodeKloud which offers one of the best learning material in DevOps world.
Link of Training Course: Ansible for absolute beginners
Note: The above links are affiliate links, if you enroll this course using the above link, then it would help us to get some monetary benefit from KodeKloud. It won’t cost you anything.
Prerequisite Setup
- Two Linux machine – one will be used as ansible controller and another one as target machine where ansible will perform the task.
- Ansible must be installed on the ansible-controller machine.
- On the target machine a user with sudo privileges is needed.
Step 1 – On ansible host create “roles” directory
Inside an empty directory create a directory with name “roles”.
ubuntu@ubuntu:~/ansible-poc$ pwd
/home/ubuntu/ansible-poc
ubuntu@ubuntu:~/ansible-poc$ mkdir roles
ubuntu@ubuntu:~/ansible-poc$
Step 2 – Create role using ansible-galaxy CLI tool
You need to go inside the “roles” directory which you created in step 1. There you need to use the ansible-galaxy CLI tool to create the role. This will create only the directory structure of ansible role.
Since we are creating ansible role for installing Java, let’s name the role as “java_install”.
ubuntu@ubuntu:~/ansible-poc$ cd roles/
ubuntu@ubuntu:~/ansible-poc/roles$ ansible-galaxy init java_install
- Role java_install was created successfully
Step 3 – Develop the role which will install Java
In step 2, we have created the skeleton of the role.
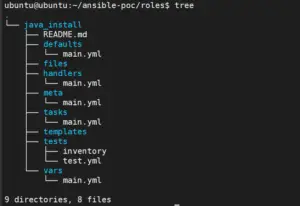
Now, in all those directories we will use only “tasks” & “vars” directories.
- You need to edit the
tasks/main.ymlfile and put the steps which is required for Java installation. - You need to edit the
vars/main.ymlfile and enter the variables (if any).
In our case, content of <strong>tasks/main.yml</strong> file –
- name: Download the JDK binaries
  get_url:
    url: "{{ jdk_download_url }}"
    dest: "{{ jdk_download_location }}"

- name: Unzip the downloaded file
  unarchive:
    src: "{{ jdk_download_location }}"
    dest: /opt
    remote_src: yes

- name: Set the JAVA_HOME in /etc/profile file
  lineinfile:
    path: /etc/profile
    state: present
    line: "{{ item }}"
  with_items:
    - 'export JAVA_HOME="{{ java_home }}"'
    - 'export PATH=$PATH:$JAVA_HOME/bin'

- name: Reload /etc/profile file
  shell:
    cmd: source /etc/profile
Content of vars/main.yml file –
jdk_download_url: https://download.java.net/java/GA/jdk18.0.2.1/db379da656dc47308e138f21b33976fa/1/GPL/openjdk-18.0.2.1_linux-x64_bin.tar.gz
jdk_download_location: /opt/openjdk-18.0.2.1_linux-x64_bin.tar.gz
java_home: /opt/jdk-18.0.2.1
Ansible will use the variables defined in the vars/main.yml file.
After editing the above two files (tasks/main.yml & vars/main.yml), save them.
Step 4 – Create ansible playbook which will use the role
The role we developed in step 3, that need to be used in the playbook. You need to create a playbook and call that role. Let’s name the playbook as java_install_playbook.yml
ubuntu@ubuntu:~/ansible-poc$ pwd
/home/ubuntu/ansible-poc
ubuntu@ubuntu:~/ansible-poc$ vi java_install_playbook.yml
ubuntu@ubuntu:~/ansible-poc$ ll
total 16
drwxrwxr-x  3 ubuntu ubuntu 4096 Dec 19 16:24 ./
drwxr-xr-x 20 ubuntu ubuntu 4096 Dec 19 16:24 ../
-rw-rw-r--  1 ubuntu ubuntu   92 Dec 19 16:17 java_install_playbook.yml
drwxrwxr-x  3 ubuntu ubuntu 4096 Dec 19 15:06 roles/
Content of java_install_playbook.yml file –
- name: Java installation
  hosts: remote_server
  become: true
  roles:
    - java_install
In the above playbook, under “hosts” section we mentioned ‘remote_server’, this same alias need to be used in the inventory file which we will see in the next step.
Step 5 – Create inventory file to capture details of target/remote server
In step 4, we saw the ansible playbook which calls the role. In this step we will create an inventory file, and we need to put the target server IP, credential into that inventory file.
Content of inventory.txt file –
remote_server ansible_host=20.177.78.90 ansible_ssh_user=test_user ansible_ssh_pass=Pa$$w0rd
Here, ansible will use “test_user” to connect with the target machine.
Currently, below are the files in our directory –
ubuntu@ubuntu:~/ansible-poc$ ll
total 20
drwxrwxr-x  3 ubuntu ubuntu 4096 Dec 19 16:36 ./
drwxr-xr-x 20 ubuntu ubuntu 4096 Dec 19 16:36 ../
-rw-rw-r--  1 ubuntu ubuntu   93 Dec 19 16:36 inventory.txt
-rw-rw-r--  1 ubuntu ubuntu   92 Dec 19 16:17 java_install_playbook.yml
drwxrwxr-x  3 ubuntu ubuntu 4096 Dec 19 15:06 roles/
Step 6 – Run the ansible playbook
In this step we will run the java_install_playbook.yml playbook which we developed in step 4.
Below are the commands –
ansible-playbook java_install_playbook.yml -i inventory.txt --ask-become-pass -vv
The above command will ask for sudo password for test_user, and we need to enter the password which is Pa$$w0rd
OR
We can run the below command.
ansible-playbook java_install_playbook.yml -i inventory.txt --extra-vars "ansible_sudo_pass=Pa$$w0rd" -vv
Step 7 – Validate the installation (Optional)
If step 6 is successful, we can log into the target machine and verify the installation. To conform the java installation, we can run the below command.
java -version
Conclusion
We have discussed a step-by-step guide on how you can create a role and use it. Now you can share it with the community using through GitHub or Ansible Galaxy.
To reuse it you need to just put the java_install role inside the “roles” directory which will sit at the root directory where all other playbooks will exist.
ubuntu@ubuntu:~/ansible-poc$ tree
.
├── inventory.txt
├── java_install_playbook.yml
└── roles
    └── java_install
        ├── README.md
        ├── defaults
        │   └── main.yml
        ├── files
        ├── handlers
        │   └── main.yml
        ├── meta
        │   └── main.yml
        ├── tasks
        │   └── main.yml
        ├── templates
        ├── tests
        │   ├── inventory
        │   └── test.yml
        └── vars
            └── main.yml

10 directories, 10 files
That’s all for now.
Thank you.
If you are interested in learning DevOps, please have a look at the below articles, which will help you greatly.
- Kubernetes Series: Part 1 – Introduction to Kubernetes | Background of Kubernetes
- Kubernetes Series: Part 2 – Components of Kubernetes cluster | Kubernetes cluster in detail
- Kubernetes Series: Part 3 – What is Minikube and How to create a Kubernetes cluster (on Linux) using Minikube?
- Introduction to Ansible | High Level Understanding of Ansible
- Basics of automation using Ansible | Automate any task
- 10 frequently used ansible modules with example
- Jenkins Pipeline as code – High level information
- What is End-to-End Monitoring of any web application and Why do we need it?
- What is “Monitoring” in DevOps? Why do we need to Monitor App/DB servers, Transactions etc.?
- DevOps Engineer or Software Developer Engineer which is better for you?- Let’s discuss
- How To Be A Good DevOps Engineer?
- How to do git push, git pull, git add, git commit etc. with Bitbucket