

Last Updated on February 2, 2023 by cscontents
Introduction
In this article we will discuss ansible role. Ansible role is one of the most important concept when we speak about reusing ansible playbooks.
Before we start, a brief intro about ansible is below,
It is a powerful IT automation tool. Using ansible we can automate many manual tasks. The power of ansible lies in its modules. Ansible has plenty of modules. Each of the module is designed for a specific task.
If you want to get a quick high level understanding of ansible, then you can have a look at the below article.
Introduction to Ansible | High Level Understanding of Ansible
If you want to learn Ansible basics then please check out the below course from KodeKloud which offers one of the best learning material in DevOps world.
Link of Training Course: Ansible for absolute beginners
Note: The above links are affiliate links, if you enroll this course using the above link, then it would help us to get some monetary benefit from KodeKloud. It won’t cost you anything.
What is Ansible role?
To explain this, let’s take an example ansible playbook which will install Java. Now if we want to reuse and share the playbook with the community then “ansible role” is the way to go. Ansible role is a standard way of structuring & developing ansible playbook.
Once we develop ansible for that task (for example, installation of Java) then we can call that role only in other task. So, using ansible role we can make our playbook more concise.
What are the advantages of using ansible role?
- It helps us to structure our ansible project in standard way.
- Using ansible role in playbook makes the playbook more concise.
- Once we develop the role, we can reuse it and share it with others.
How to create ansible role?
By creating ansible role, we mean just creating its directory structure, we need to manually add/edit the YAML files and add the tasks which will be performed by the role. There are mainly two ways through which we can create ansible role –
By using ansible-galaxy command line tool
This is the recommended way to create ansible role. Using ansible-galaxy command line tool makes our job easier and saves time. Below is the command to create ansible role using ansible-galaxy.
ansible-galaxy init <role name>
For example,
ansible-galaxy init test-role
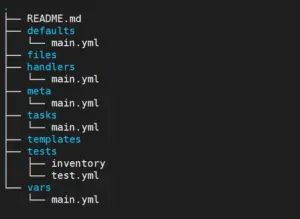
If we run the above ansible-galaxy command, it will create a directory with name “test-role”. And below will be the directory structure of this test-role. This structure is by default. Whenever you create a role using this ansible-galaxy you will get this directory structure.
On the other hand, Ansible Galaxy is a repository where developers share their role. You can leverage this repository to find already developed ansible roles and use them in your ansible playbook.
By manually creating folder structure like ansible role’s directory structure
In the above screenshot we can see what kind of directory structure ansible-galaxy creates. Similar kind of directory structure can also be created manually. No issue on that if we create it manually. But it will take some time & effort.
Explanation of the files/directories inside the role directory
We saw what kind of directory structure exist inside an ansible role directory. Now we will try to understand each of the file/directory inside the role directory.
README.md – this is a README file where description about the role is captured.
Apart from this file there are total 8 directories inside the role directory. In each of these directories ansible will look for main.yml file for relevant content. We can remove the directories which ansible does not use.
- defaults – In this “defaults” directory, default variables are defined. These variables will have the lowest priority among all the variables. And they can be easily overridden by other variables. Inventory variable can also override these defaults variables. Point to be noted, it is not mandatory that you need to define default variables in the “defaults” directory. You can leave it if you don’t need it.
- files – the files which will be used by the roles those files need to be placed under this “files” directory. It is not mandatory to put files here, if your role requires task then only you need to put otherwise you can ignore it or remove the directory.
- handlers – under this directory handlers are captured (if any). If there are no handlers, then you can leave it or remove the directory.
- meta – metadata for the role is captured here. Basically, under this meta directory we can capture technical info related to the role. For this we need to edit the main.yml file and add the details. This is optional if you want then you can capture. Generally, while publishing the role in ansible galaxy, we need to put the details since it will be used by others, so they need to understand the technical details.
- tasks – the tasks which will be performed by the role need to be captured under this tasks folder. In the main.yml file we need to put the tasks. This “tasks” is mandatory, because this is the main directory where we need to create actual playbook which will perform the task.
- templates – Under this directory we can put the templates which will be used by the role. Basically, it contains the templates of the configuration files which will be used by ansible.
- tests – Under this “test” directory we can keep an inventory file and ansible playbook to test the role. This is optional.
- vars – variables are defined under this “vars” directory. We need to put the variables & its value in the yml file. It is good practice to use variable instead of hard coding the values. So, you can use this “vars” directory to define the variables.
How to use ansible role in the playbook?
Below is the step-by-step guide which you can follow to use ansible role in playbook –
Step 1: Create roles directory
At first, you need to create a directory with name “roles”.
ubuntu@ubuntu-01:~/ansible-project$ mkdir roles

ubuntu@ubuntu-01:~/ansible-project$ tree
.
└── roles

1 directory, 0 files
Step 2: Create/place the role inside roles directory
Inside the “roles” directory you need to create or place the concerned ansible role. If you would like to create a role by yourself then you could use the ‘ansible-galaxy’ command line tool. Otherwise, you can download the concerned role from the ansible galaxy repository if it is already developed by someone.
ubuntu@ubuntu-01:~/ansible-project$ cd roles/
ubuntu@ubuntu-01:~/ansible-project/roles$ ansible-galaxy init ping_test_role
- Role ping_test_role was created successfully
ubuntu@ubuntu-01:~/ansible-project/roles$ cd ..
ubuntu@ubuntu-01:~/ansible-project$ tree
.
└── roles
    └── ping_test_role
        ├── README.md
        ├── defaults
        │   └── main.yml
        ├── files
        ├── handlers
        │   └── main.yml
        ├── meta
        │   └── main.yml
        ├── tasks
        │   └── main.yml
        ├── templates
        ├── tests
        │   ├── inventory
        │   └── test.yml
        └── vars
            └── main.yml

10 directories, 8 files
Step 3: Edit the YAML files in the role directory
By step 2 you have just created only directory structure of the role. Now you need to work on editing or adding proper tasks in the tasks/main.yml file in the ping_test_role directory.
If you are taking/downloading the role from the ansible galaxy repository, then it should be already developed & tested. You should have a look and check the tasks which will be performed by the role.
Step 4: Create ansible playbook & inventory file
You need to create a playbook in the same directory where roles directory exist. You can name the playbook as you wish. You also need to create an inventory file. In this inventory file you need to put the details (like IP, username & password) of the target machine where ansible will perform the task.
ubuntu@ubuntu-01:~/ansible-project$ pwd
/home/ubuntu/ansible-project
ubuntu@ubuntu-01:~/ansible-project$
ubuntu@ubuntu-01:~/ansible-project$ vi ping_test_playbook.yml
ubuntu@ubuntu-01:~/ansible-project$ vi inventory.txt
ubuntu@ubuntu-01:~/ansible-project$ tree
.
├── inventory.txt
├── ping_test_playbook.yml
└── roles
    └── ping_test_role
        ├── README.md
        ├── defaults
        │   └── main.yml
        ├── files
        ├── handlers
        │   └── main.yml
        ├── meta
        │   └── main.yml
        ├── tasks
        │   └── main.yml
        ├── templates
        ├── tests
        │   ├── inventory
        │   └── test.yml
        └── vars
            └── main.yml

10 directories, 10 files
Content of ping_test_playbook.yml is below –
-
  name: Ping test using ansible role
  hosts: remote_server
  become: true
  roles:
    - ping_test_role
Content of the inventory.txt file is below –
remote_server ansible_host=20.177.78.90 ansible_ssh_user=test_user ansible_ssh_pass=Pa$$w0rd
Step 5: Execute the playbook
This is the final step, now you should execute the ansible playbook.
ansible-playbook playbook.yml -i inventory.txt --ask-become-pass -vv
OR
ansible-playbook playbook.yml -i inventory.txt --extra-vars "ansible_sudo_pass=Pa$$w0rd" -vv
How to share ansible role?
Below are the few ways by which we can share ansible role –
- We can create GitHub public repo and reuse them in future projects.
- We can share them in Ansible Galaxy repository.
That’s all for now.
Thank You.
If you are interested in learning DevOps, please have a look at the below articles, which will help you greatly.
- Introduction to Ansible | High Level Understanding of Ansible
- Basics of automation using Ansible | Automate any task
- Automation of Java installation — using Ansible
- Automation of JBoss EAP installation — using ansible
- Jenkins Pipeline as code — High level information
- Jenkins pipeline script to build Java application and push artifacts into repository
- Jenkins pipeline script to build & deploy application on web server
- What is End-to-End Monitoring of any web application, and Why do we need it?
- How To Be A Good DevOps Engineer?
- How to do git push, git pull, git add, git commit etc. with Bitbucket
- 7 important terraform commands
- 7 important docker commands