
Last Updated on February 18, 2023 by cscontents
Introduction
If you are starting with Bitbucket and don’t know how to do git push, git pull etc. then you are in the right place. Please go through this article, you will get to know all the steps.
Here we will discuss step-by-step process starting from creating a repository in Bitbucket.
Step-by-step guide
Below is the step-by-step guide.
Step – 1: Create a new Git repository
Create a new repository from Bitbucket dashboard. Go to the below URL.
https://bitbucket.org/dashboard/repositories
Log into your Bitbucket account (if you don’t have an account, please create one)
Now, as shown in the below screenshot, please create a repository.
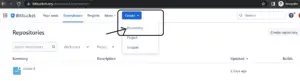
Once you will click on the “Repository” as shown in the above screenshot, you will get the below window where you have to enter few details as explained in the below screenshot.
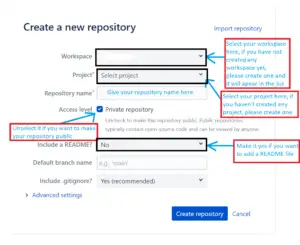
This repository you created is known as ‘remote repository’.
Step – 2: Create app password
After creating repository in Bitbucket we need to create one app password to perform various activities like push, pull etc. in this repository.
- At the right most top corner area, there will be your avatar or profile pic kind of thing.
- Click on this avatar, and you will get “Personal Settings”.
- Click on “Personal Settings” a new window will open.
- In the new window under “Access Management” you will see “App passwords”.
- Click on the “App passwords” and create one. Here you need to give a label for this app password and after creating the password you have to copy the password and keep it in a safe place (since once you will close the window you will never see the app password again).
For reference, please follow the below link:
https://support.atlassian.com/bitbucket-cloud/docs/app-passwords/
Step – 3: Set the Git Remote Repository URL
Open Git Bash or Command Prompt in your computer.
Create a folder with the name of your choice and go inside the folder.
Now, at first, run the below command to initialize the local repository.
git init
Next, run the below command to add the remote repository URL.
git remote add origin https://Bitbucket-Profile-Username:app-password@bitbucket.org/workspace-name/repo-name.git
Now, once the remote repository URL is set by using the above command, due to any reason if we want to change the remote repository URL (for example, we want to switch to any other repository), then we can use the below command to set the URL of remote repository.
git remote set-url origin https://Bitbucket-Profile-Username:app-password@bitbucket.org/workspace-name/repo-name.git
In the above command, “set-url” is used to change the URL of the remote repository. Once the remote URL is set, then we can run a command with “set-url” to change it.
Below official document can be followed for reference.
https://docs.github.com/en/get-started/getting-started-with-git/about-remote-repositories
To check the configured remote repositories or repositories URL, run the below command.
git remote -v
Step – 4: Sync up Git remote repository and Git local repository
Before starting any activity in our local repository, to make sure remote repository and local repository are synced up, please run the below command.
git pull origin master
Here ‘master’ is the branch name (since currently we are in master branch, if you are in a different branch please mention the correct branch name in place of master).
Though, we could do this at any later stage. Just to make sure everything goes smoothly, we have synced up at beginning only.
To check your current git branch, run the below command
git branch
Step – 5: Git Status – To check changes (Optional step)
Now create some file (for testing purpose) in the folder on your computer (It is your local repository where your .git folder exist).
Optional – Run the below command to check the status of the changes or all the unstaged files. Before command is just for checking purpose.
git status
Step – 6: Git add (add your changes in local repository)
Run the below command to add the changes in your local repository.
git add .
Step – 7: Git commit (commit the changes in local repository)
Run the below command to commit the changes in your local repository.
git commit -m "adding new file"
‘-m’ is for message. You have to pass some commit message while committing. You can pass any customized message as you wish.
Step – 8: Git Push (push the changes of local repo to remote repo)
git push -u origin master
Here, ‘-u’ stands for upstream, which means remote repository.
Thank You.
If you are interested in learning DevOps, please have a look at the below articles, which will help you greatly.
- Kubernetes Series: Part 1 – Introduction to Kubernetes | Background of Kubernetes
- Kubernetes Series: Part 2 – Components of Kubernetes cluster | Kubernetes cluster in detail
- Kubernetes Series: Part 3 – What is Minikube and How to create a Kubernetes cluster (on Linux) using Minikube?
- Introduction to Ansible | High Level Understanding of Ansible
- Basics of automation using Ansible | Automate any task
- What is End-to-End Monitoring of any web application and Why do we need it?
- What is “Monitoring” in DevOps? Why do we need to Monitor App/DB servers, Transactions etc.?
- DevOps Engineer or Software Developer Engineer which is better for you?- Let’s discuss
- How To Be A Good DevOps Engineer?
- Network Connectivity Troubleshooting Guide for Beginners