

Last Updated on August 3, 2023 by cscontents
Introduction
In this article, we will discuss how to use Atom IDE to sync files with a remote server.
First, let’s understand why do we need this, I will take one example.
For example, you are working “Ansible playbook” and your remote Linux server is ‘ansible host’. Now, it is a little difficult to write those playbooks on Linux file editor. If you want to change or add anything in the playbook, you must open that file, edit it and save it, which is a time-consuming process.
Instead of doing the above, if we do all our editing on our local computer and anyway if we could push all those changes to the remote server, then it will save a lot of time and effort and to achieve this we can use the “Remote Sync” feature of Atom IDE.
By the way, if you want to learn Ansible or want to get a high level understanding of Ansible, head over to this Introduction to Ansible article.
If you want to learn Ansible basics then please check out the below course from KodeKloud which offers one of the best learning material in DevOps world.
Link of Training Course: Ansible for absolute beginners
Note: The above links are affiliate links, if you enroll this course using the above link, then it would help us to get some monetary benefit from KodeKloud. It won’t cost you anything.
Step-by-Step guide
Below is the step-by step guide.
Step – 1
On remote machine,
Create one temp directory, you can give it any name. I am giving it ‘temp’ name.
ubuntu@ubuntu:~$ mkdir temp
ubuntu@ubuntu:~$ cd temp/
ubuntu@ubuntu:~/temp$ pwd
/home/ubuntu/temp
The above path will be required while we configure the remote sync option in Atom IDE.
Step – 2
We have to install the atom remote-sync package on our local machine where Atom IDE is running.
Below is the link where we can find the step by guide to install the package.
https://atom.io/packages/remote-sync
Step – 3
Now on your local computer,
Create a new folder in the Desktop or in another directory and give it any name. In my case, I named it ‘temp’ only.
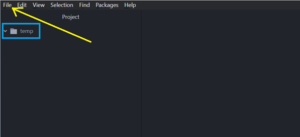
Open Atom IDE and open this newly created folder from “File”.
Step – 4
In Atom IDE, right-click on the temp folder and go to “Remote Sync” and under this click on “Configure”.
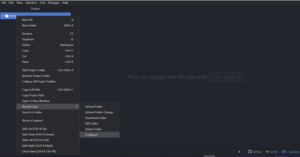
After clicking on “Configure”, a new window will open (as shown below) for configuring the remote host.

If by default SCP/SFTP option is selected, then click on “FTP”, we will use FTP.
Under ‘Hostname’ enter the remote server IP
Under ‘Port’ enter 22
Under ‘Target directory’ enter the directory which we created in Step – 1, which is /home/ubuntu/temp
Under ‘Ignore Paths’, you can enter the files which you want to ignore. If you don’t fill it by default, it will ignore .remote-sync.json and .git/** files.
Under ‘Username’ enter the login username of the remote server.
Under ‘Password’ enter the login password of the remote server.
Finally, select “uploadOnSave” and click on ‘Save’.
Once you save the above, a .remote-sync.json file will be created in Atom IDE. If you open that file, you will see all the details which you have filled about the remote server.
Step – 5
Now it is time to create our projects or any files which you want to be there in remote server.
In the Atom IDE, under the temp folder, create any file and enter some text in it and save the file.
Once you press Ctrl + S for saving any file in “Atom IDE”, you will see logs of connection between your local machine and remote server in the bottom window of ‘Atom IDE’.
That’s all, we are done with remote syncing of our files using Atom IDE, which is a great workaround to save our precious time.
Thanks for your time.
If you are interested in learning DevOps, please have a look at the below articles, which will help you greatly.
- Kubernetes Series: Part 1 – Introduction to Kubernetes | Background of Kubernetes
- Kubernetes Series: Part 2 – Components of Kubernetes cluster | Kubernetes cluster in detail
- Kubernetes Series: Part 3 – What is Minikube and How to create a Kubernetes cluster (on Linux) using Minikube?
- Introduction to Ansible | High Level Understanding of Ansible
- Basics of automation using Ansible | Automate any task
- What is End-to-End Monitoring of any web application and Why do we need it?
- What is “Monitoring” in DevOps? Why do we need to Monitor App/DB servers, Transactions etc.?
- DevOps Engineer or Software Developer Engineer which is better for you?- Let’s discuss
- How To Be A Good DevOps Engineer?
- Network Connectivity Troubleshooting Guide for Beginners
- How to do git push, git pull, git add, git commit etc. with Bitbucket