
Last Updated on March 30, 2023 by cscontents
Introduction
Tomcat is one of the most popular & widely used open-source web servers. It also works as a servlet container to serve Java applications. Tomcat web server is licensed under the Apache License. Tomcat web server is written in Java language.
Prerequisite
To complete this tutorial, you need the below prerequisites.
- One ubuntu machine with a user who has sudo privileges
- Knowledge of basic Linux commands.
Steps to install Tomcat
Below are the steps to install Tomcat.
Step 1: Install JDK
Since Tomcat is written in Java, it requires Java runtime to be present on the machine. In this step, we will install JDK.
Follow the below document to install Java on the ubuntu machine.
https://cscontents.com/java-installation-on-ubuntu-rhel-centos/#Java_installation_on_Ubuntu
After installation, please check the JAVA_HOME path & note it down it will be required in step-4 where we will create a systemd service file for Tomcat.
echo $JAVA_HOME
If the JAVA_HOME path is not set, please set it by following the above article.
Step 2: Create a user for tomcat
It is recommended to run any software under a dedicated user in Linux. Here also we will create a user for Tomcat. We will call it ‘tomcat’.
sudo useradd tomcat
To verify the created user & group run the below commands.
To verify the tomcat user –
cat /etc/passwd | grep tomcat
To verify the tomcat group –
cat /etc/group | grep tomcat
Step 3: Download Tomcat Binaries
We will be installing Tomcat 10. For this download the tomcat binaries. If you want to install a different version of Tomcat, then please download the required version.
We will keep the tomcat binaries under /opt directory.
Now, download the binaries.
sudo wget https://dlcdn.apache.org/tomcat/tomcat-10/v10.1.7/bin/apache-tomcat-10.1.7.tar.gz
Step 4: Extract the binaries
Run the below command to unzip the downloaded tomcat binaries.
sudo tar xzvf apache-tomcat-10.*.tar.gz
Once we extract the binaries we will a directory with the name apache-tomcat-10.*.*
For simplicity, we will rename the apache-tomcat-10.*.* directory to ‘tomcat’
sudo mv apache-tomcat-10.1.7 tomcat
Step 5: Change the ownership of the tomcat directory
Run the below command to change the owner & group of the tomcat directory.
sudo chown -R tomcat:tomcat /opt/tomcat/
Step 6: Create a Tomcat service file
To run the Tomcat web server quietly in the background we need to create a systemd service for Tomcat.
Run the below command.
sudo vi /etc/systemd/system/tomcat.service
Paste the below content (edit the values as per your environment, for example, you should enter the correct JAVA_HOME path)
[Unit]
Description=Tomcat 10
After=network.target

[Service]
Type=forking

User=tomcat
Group=tomcat

Environment="JAVA_HOME=/usr/lib/jvm/java-11-openjdk-amd64"
Environment="JAVA_OPTS=-Djava.security.egd=file:///dev/urandom"

Environment="CATALINA_BASE=/opt/tomcat"
Environment="CATALINA_HOME=/opt/tomcat"
Environment="CATALINA_PID=/opt/tomcat/temp/tomcat.pid"
Environment="CATALINA_OPTS=-Xms512M -Xmx1024M -server -XX:+UseParallelGC"

ExecStart=/opt/tomcat/bin/startup.sh
ExecStop=/opt/tomcat/bin/shutdown.sh

[Install]
WantedBy=multi-user.target
Finally, save the file.
Step 7: Start the tomcat web server
In the previous step, we created a service file for tomcat.
Since we added a new service file, so we need to reload the systemd daemon.
sudo systemctl daemon-reload
Now, start the tomcat service.
sudo systemctl start tomcat
Check the status of the tomcat service.
sudo systemctl status tomcat
Finally, we will enable the tomcat service.
sudo systemctl enable tomcat
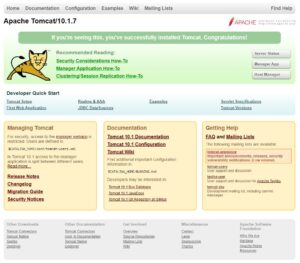
Step 8: Access the web interface (optional)
Once the tomcat server is up & running, we can access its web interface from the browser. You need to enter the below URL.
Note: you need to allow port 8080 in your machine’s network. Basically, you need to add an inbound rule.
Thank You.
If you are interested in learning DevOps, please have a look at the below articles, which will help you greatly.
- How to create ansible role for Java installation – a simple guide
- Kubernetes Series: Part 1 – Introduction to Kubernetes | Background of Kubernetes
- Kubernetes Series: Part 2 – Components of Kubernetes cluster | Kubernetes cluster in detail
- Kubernetes Series: Part 3 – What is Minikube and How to create a Kubernetes cluster (on Linux) using Minikube?
- Introduction to Ansible | High Level Understanding of Ansible
- Basics of automation using Ansible | Automate any task
- 10 frequently used ansible modules with example
- Jenkins Pipeline as code – High level information
- What is End-to-End Monitoring of any web application and Why do we need it?
- What is “Monitoring” in DevOps? Why do we need to Monitor App/DB servers, Transactions etc.?
- DevOps Engineer or Software Developer Engineer which is better for you?- Let’s discuss
- How To Be A Good DevOps Engineer?
- How to do git push, git pull, git add, git commit etc. with Bitbucket