
Last Updated on September 16, 2024 by cscontents
Introduction
Jenkins is a popular pipeline tool. It is extensively used for creating CI (continuous integration) pipelines. Not only CI pipeline, Jenkins can be used for CD (Continuous Delivery) pipeline also. Together we can say Jenkins is used for creating CI/CD pipelines.
In this tutorial, we will discuss Jenkins master-slave architecture. We will see how we can add a slave machine to Jenkins master. We can add multiple slave machines. For example, for each environment, we can have one slave machine.

It is advisable to have Jenkins master-slave architecture if your project is big and has many applications. It gives many flexibilities like –
- We can easily separate out Jenkins job executor for the different environments using slave/agent for each env.
- Adding slave machines increases the number of job executors.
- It reduces the load from Jenkins master. In master-slave architecture, the master server orchestrates the slave machines, etc.
Prerequisite
- We should have a Jenkins master server where Jenkins should be up & running. Here we assume that Jenkins is running with the Linux user ‘
jenkins’. And Jenkins dashboard should be accessible. - We should have another machine that will work as a Jenkins slave.
- Go through the below document to get a basic understanding of how to connect with a Linux machine using SSH key-pair https://cscontents.com/how-to-do-ssh-to-remote-linux-machine-using-ssh-key/
Steps to add Jenkins slave
Below is a step-by-step guide to adding a Jenkins slave machine with Jenkins master.
Step 1: Open port 22 (SSH)
Allow network connectivity over port 22 (SSH) between the Jenkins master & slave node.
Step 2: Install JDK
Install JDK in the slave machine. Follow the below article for installing JDK.
https://cscontents.com/java-installation-on-ubuntu-rhel-centos/
Step 3: Create a Linux user in the slave machine
Create a dedicated user in the slave node that will be used by the Jenkins master to connect with the slave. For example, we will create a user ‘jenkins’.
Run the below command in the slave machine.
sudo useradd jenkins
Step 4: Identify a directory on the slave for workspace
Identify a directory in the slave node that will be used by the Jenkins master. That directory will be known as the “remote directory”. You need to enter this “remote directory” in step 9.
Step 5: Create SSH key-pair in Jenkins master machine
Create SSH key-par in Jenkins Master (public key & private key). To create the SSH key pair in the Jenkins master node, first switch to the jenkins user which is used by the Jenkins service. Run the below command to switch to jenkins user.
sudo su -s /bin/bash jenkins
Now, run the below command.
ssh-keygen
Keep on pressing enter, by default, it will create the private key in the id_rsa file & public key in the id_rsa.pub file.
total 12
-rw-------. 1 jenkins jenkins 2610 Apr  5 14:25 id_rsa
-rw-r--r--. 1 jenkins jenkins  575 Apr  5 14:25 id_rsa.pub
-rw-r--r--. 1 jenkins jenkins  175 Apr  5 15:06 known_hosts
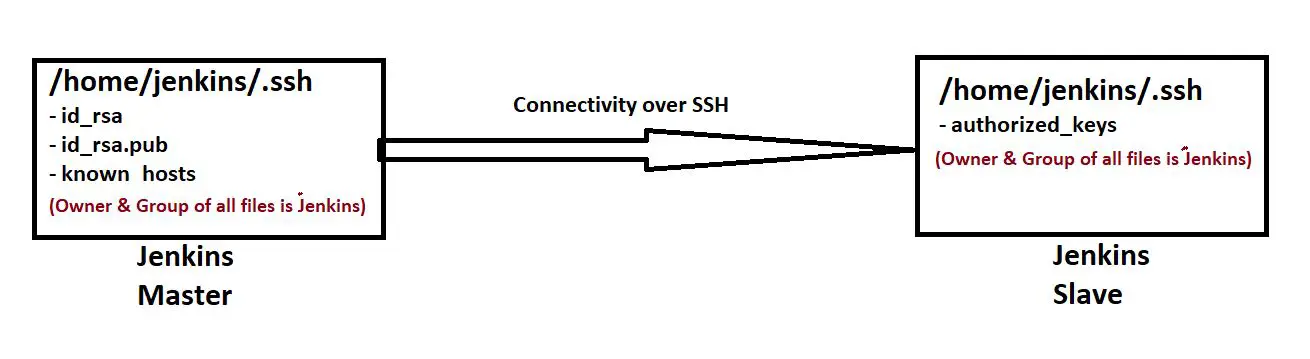
Step 6: Copy the public key into the slave machine
In step-3 we created a user (jenkins) in the slave node, and with that, it automatically created /home/jenkins directory in the slave machine. Under /home/jenkins directory create a .ssh folder and a file with the name authorized_keys.
Run the below commands one by one.
cd /home/jenkins
mkdir .ssh
touch authorized_keys
Copy the public key (id_rsa.pub file which was generated in step-5) from the master node and paste it into the /home/jenkins/.ssh/authorized_keys file of the slave node.
Note: Here owner & group of the authorized_keys file & .ssh folder should be jenkins
Step 7: Create credentials in the Jenkins dashboard
Create a credential of type “SSH Username with private key” in the dashboard of Jenkins master. Here use the username created in step-3 and use the private key that was generated in step-5.

Step 8: Update the known_hosts file in Jenkins master
Log into the Jenkins master machine & switch to the ‘jenkins‘ user which is used by the Jenkins service. Now, SSH into the Jenkins slave node. It will add the fingerprint to the /home/jenkins/.ssh/known_hosts file of the Jenkins master node.
Run the below commands.
sudo su -s /bin/bash jenkins
If you are unable to switch to the ‘jenkins’ user, please use any other user, no issue with that. Here, we just want to add the fingerprint of the slave machine to the Jenkins master machine. For example, you are using a user ‘linux-user’ and as ‘linux-user‘ you run the below command, in that which will add the fingerprint to the /home/linux-user/.ssh/known_hosts file. In that case, you need to copy the content of home/linux-user/.ssh/known_hosts file and paste it into /home/jenkins/.ssh/known_hosts file of the Jenkins master server.
ssh linux-user@28.88.130.44
On the above command replace the ‘linux-user’ with any user which is created in the slave machine. And replace the IP with your slave machine’s IP.
Once we execute the above command it will ask for adding the fingerprint of the slave machine into the master server. Please type ‘yes’.
Step 9: Add the slave node from the Jenkins dashboard
Open the Jenkins Master dashboard & go to Manage Jenkins -> Manage nodes and clouds.
And click on the “New Node”.

This will open up to enter a new node name & node type.

After entering the node name & selecting the type we need to click on “Create”. Once we click on “create” it will open up for detailed configuration details of the slave node.


Once we enter all the configuration details, we need to click on the “save” button which is at the bottom.
Step 10: Launch the slave node
Once we save the configuration in step 9, it starts connecting with the slave machine. If needed we can relaunch the slave node again.

We can check the logs by clicking on the “Log” option shown in the left menu. If there is any issue or error while connecting with the slave machine it will be shown in the logs.
Software packages need to be installed on Jenkins slave
A few software packages need to be installed in the Jenkins slave machine before it is ready for use.
- Java – we have already installed JDK in the previous steps.
- Git – we need to install git so that it can clone the repo from the source code repository.
Thank You.
If you are interested in learning DevOps, please have a look at the below articles, which will help you greatly.
- Introduction to Ansible | High Level Understanding of Ansible
- Basics of automation using Ansible | Automate any task
- Automation of Java installation – using Ansible
- 10 frequently used ansible modules with example
- Jenkins Pipeline as code – High level information
- Jenkins pipeline script to build Java application and push artifacts into repository
- Jenkins pipeline script to build & deploy application on web server
- What is End-to-End Monitoring of any web application, and Why do we need it?
- What is “Monitoring” in DevOps? Why do we need to Monitor App/DB servers, Transactions etc.?
- DevOps Engineer or Software Developer Engineer which is better for you?- Let’s discuss
- How To Be A Good DevOps Engineer?
- How to do git push, git pull, git add, git commit etc. with Bitbucket