
Last Updated on February 18, 2023 by cscontents
Introduction
In this article we will discuss step-by-step guide to log into remote Linux machine using SSH keys.
Prerequisite
- Knowledge on SSH
- Basic Linux commands
Flow of steps
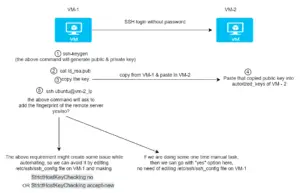
Below is a simple diagram which tells us the steps,
Step-by-step guide
In this example, we assume that we will log in from VM-1 to VM-2. Both are Linux machine.
Once you are logged into the VM-1 machine, follow the below steps.
Step 1: .ssh folder creation
Go inside the .ssh folder. Usually, .ssh folder exist in the user home directory. For example, if you logged into VM-1 using test_user, then .ssh folder will be in /home/test_user directory.
[test_user@RHEL01 ~]$ cd .ssh/
If .ssh folder does not exist, then you need to create one.
[test_user@RHEL01 ~]$ mkdir .ssh
[test_user@RHEL01 ~]$ cd .ssh/
Next we will run the below command ssh-keygen command.
[test_user@RHEL01 .ssh]$ ssh-keygen
Generating public/private rsa key pair.
Enter file in which to save the key (/home/test_user/.ssh/id_rsa):
Enter passphrase (empty for no passphrase):
Enter same passphrase again:
Your identification has been saved in /home/test_user/.ssh/id_rsa.
Your public key has been saved in /home/test_user/.ssh/id_rsa.pub.
The key fingerprint is:
SHA256:********************************* test_user@RHEL01
The key's randomart image is:
+---[RSA 2048]----+
|BX*.   .==o      |
|++.B . oo+ .     |
|  B + o   o o    |
| o +   . o +     |
|  . o   E =      |
|   . o . o +     |
|    . .   .oo    |
|     .o.. +.     |
|     o++oo..     |
+----[SHA256]-----+
Step 2: Generate SSH public key
In the previous step the ssh-keygen command has generated two key –
- One is public key (key is in the id_rsa.pub file) – we can share this key with other machines.
- Another is private key (key is in the id_rsa file) – we need to safely keep this private key.
Now, id_rsa.pub file which has the public key of the machine VM-1, we need to copy that public key from this file.
[test_user@RHEL01 .ssh]$ pwd
/home/test_user/.ssh
[test_user@RHEL01 .ssh]$ cat id_rsa.pub
Step 3 & 4: Copy & Paste SSH public key
In this step we need to copy the public key from step-2 and log into the VM-2 and open the .ssh/authorized_keys file and paste it and save the file (if .ssh/authorized_keys file doesn’t exist then create one).
Step 5: SSH to remote machine
In this step we will try to ssh from VM-1 to VM-2 by running the below command.
[test_user@RHEL01 .ssh]$ ssh ubuntu@45.76.27.143
The authenticity of host '45.76.27.143 (45.76.27.143)' can't be established.
ECDSA key fingerprint is **************************************************.
Are you sure you want to continue connecting (yes/no/[fingerprint])?
Here in the above command, we are logging into VM-2 (having IP: 45.76.27.143) with ubuntu user. You need to replace the above IP with your IP.
After step-5 we have two option –
- We can go with ‘yes’ option, and you will be able to log in.
- If we want to avoid the above situation where we need to enter yes/no, in that case we need to edit /etc/ssh/ssh_config file on VM-1. Here we have two option –
- We can go with
StrictHostKeyChecking noORStrictHostKeyChecking accept-new
- We can go with
Thank You.
If you are interested in learning DevOps, please have a look at the below articles, which will help you greatly.
- Kubernetes Series: Part 1 – Introduction to Kubernetes | Background of Kubernetes
- Kubernetes Series: Part 2 – Components of Kubernetes cluster | Kubernetes cluster in detail
- Kubernetes Series: Part 3 – What is Minikube and How to create a Kubernetes cluster (on Linux) using Minikube?
- Introduction to Ansible | High Level Understanding of Ansible
- Basics of automation using Ansible | Automate any task
- Automation of Java installation – using Ansible
- 10 frequently used ansible modules with example
- Jenkins Pipeline as code – High level information
- Jenkins pipeline script to build Java application and push artifacts into repository
- What is End-to-End Monitoring of any web application, and Why do we need it?
- What is “Monitoring” in DevOps? Why do we need to Monitor App/DB servers, Transactions etc.?
- DevOps Engineer or Software Developer Engineer which is better for you?- Let’s discuss
- How To Be A Good DevOps Engineer?
- How to do git push, git pull, git add, git commit etc. with Bitbucket