

Last Updated on April 19, 2024 by cscontents
Introduction
NGINX, beyond its well-known capabilities as a robust web server, shines as a versatile tool for distributing incoming web traffic across multiple servers, a process known as load balancing. With its lightweight and high-performance architecture, NGINX emerges as an ideal choice to be used as a load balancer. The benefits of using NGINX as a load balancer include efficient resource utilization, improved response times, and seamless scalability.
In this article, we will see a step-by-step guide to configuring NGINX as a load balancer.
Prerequisite
You need to fulfill the below prerequisite.
- Two Linux machines are required for this demo project. We have two machines with the names Server-1 and Server-2.
- On both Linux machines you need to have a user created with proper sudo privileges to perform the activity.
- On both machines required port must be allowed for inbound connectivity.
- You need to have some basic knowledge and experience working with NGINX.
- You need to have experience in basic Linux commands.
Implementation Plan of this Guide/Demo Project
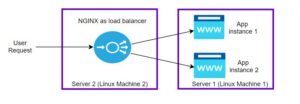
Below is the plan which we will implement in this guide. We have two Ubuntu machines.
- In one machine (Server-1/Linux machine 1), we will install NGINX and deploy two instances of a sample static web app. We will run the application instances over ports 81 and 82.
- On the other machine (Server-2/Linux machine 2), we will install NGINX and configure it to work as a loadbalancer in front of the two instances of the sample web app. Here, we will configure NGINX to work over port 83 as a load balancer.
Sections of this Guide
For simplicity, this guide is divided into 3 sections.
- Section 1: Installation of NGINX on Server-1 and Server-2.
- Section 2: Deploy two instances of a sample application.
- Section 3: Configure NGINX as a load balancer.
- Section 4: Validate the working of NGINX as a load balancer.
Section 1: Installation of NGINX on Server-1 and Server-2
Follow the below steps to install NGINX on both machines/Server.
Step 1: Update Linux OS Package
Run the below command to update the Linux OS package.
sudo apt updateStep 2: Install NGINX
Run the below command to install NGINX using the package manager.
sudo apt install nginxStep 3: Start NGINX
Run the below command to start the nginx service.
sudo systemctl start nginxStep 4: Check the Status of NGINX
Run the below command to check the status of NGINX.
systemctl status nginxStep 5: Validate by Accessing the NGINX Home Page from any Browser
To validate whether we can access the NGINX home page or not, for this first port 80 needs to be allowed. Once port 80 is allowed on the network of both servers you can try accessing the below URLs (replace the server-1-ip with your machine ip).
NGINX on Server 1: http://server-1-ip:80
NGINX on Server 2: http://server-2-ip:80
Section 2: Deploy Two Instances of a Sample Application
Perform the below steps twice to deploy two instances of the sample application.
Step 1: Create HTML static pages
Run the below commands to create two directories and HTML pages. Let’s call the app instances mywebapp_1 and mywebapp_2.
For mywebapp_1
sudo mkdir /var/www/mywebapp_1Next, run the below command to create the index.html pages.
sudo vi /var/www/mywebapp_1/index.htmlPaste the below content in the index.html file and save it.
<h1>Hello World! This is a Sample Static Webpage</h1>For mywebapp_2
sudo mkdir /var/www/mywebapp_2Now, run the below command to create the index.html page under mywebapp_2.
sudo vi /var/www/mywebapp_2/index.htmlPaste the below content in the index.html file and save it.
<h1>Hello World! This is a Sample Static Webpage</h1>Step 2: Create configuration files under /etc/nginx/sites-available
Run the below command to create a configuration file for mywebapp_1.
sudo vi /etc/nginx/sites-available/mywebapp_1Once the file opens up in the editor, paste the below content.
server {
    listen 81;
    listen [::]:81;
    server_name mywebapp_1;
    root /var/www/mywebapp_1;
    index index.html index.htm;
    location / {
    try_files $uri $uri/ =404;
    }
}
Similarly, run the below command to create a configuration file for mywebapp_2.
sudo vi /etc/nginx/sites-available/mywebapp_2Paste the below content in the mywebapp_2 file.
server {
    listen 82;
    listen [::]:82;
    server_name mywebapp_2;
    root /var/www/mywebapp_2;
    index index.html index.htm;
    location / {
    try_files $uri $uri/ =404;
    }
}
Step 3: Create symlink of the sites created under sites-available
We need to create symlinks of the sites created in the previous step to enable the sites.
Run the below commands to create a symlink for each site created under /etc/nginx/sites-available directory to /etc/nginx/sites-enabled.
sudo ln -s /etc/nginx/sites-available/mywebapp_1 /etc/nginx/sites-enabledand
sudo ln -s /etc/nginx/sites-available/mywebapp_2 /etc/nginx/sites-enabledStep 4: Verify the NGINX Configurations and Reload NGINX
Finally, we need to verify the NGINX configuration and reload NGINX to reflect all the changes we made in the previous steps.
sudo nginx -tIf the above command shows configuration is OK, then run the below command to reload NGINX.
sudo nginx -s reloadStep 5: Validate the Two Instances of the Static App from a Browser
To validate, try to access the sites from any browser (replace the server-1-ip with your machine IP).
Sample app instance 1: http://server-1-ip:81
Sample app instance 2: http://server-1-ip:82
Section 3: Configure NGINX as a load balancer
In this section, we will configure NGINX to work as a loadbalancer.
For this, we installed NGINX on the second Linux machine. Next, follow the below steps to configure NGINX.
Step 1: Create a configuration file under /etc/nginx/conf.d
Run the below command.
sudo vi /etc/nginx/conf.d/loadbalancer.confThe above command will open up a new file. In that file, paste the below code snippet and save the file.
  upstream backend {
      server 10.12.1.6:81; ## This URL is of app instance 1
      server 10.12.1.6:82; ## This URL should be accessible
   }
   # Here, the upstream name and the proxy_pass need to match.
   server {
      listen 83; # loadbalancer will receive the requests over port 83
      location / {
          proxy_pass http://backend;
      }
   }
In the above loadbalancer.conf file,
- Under the ‘
upstream’ block we have added the URLs of app instances. Here, we have used private IP which is more secure. - Under the ‘
server’ block we have configured port 83, which means the NGINX loadbalancer will listen over port 83. When the NGINX load balancer receives any request, it will forward the traffic to one of the app instances.
With the above configuration, below is the nginx.conf file which is the most important configuration file for NGINX to work.
user www-data;
worker_processes auto;
pid /run/nginx.pid;
include /etc/nginx/modules-enabled/*.conf;
events {
        worker_connections 768;
        # multi_accept on;
}
http {
        sendfile on;
        tcp_nopush on;
        tcp_nodelay on;
        keepalive_timeout 65;
        types_hash_max_size 2048;
        # server_tokens off;

        include /etc/nginx/mime.types;
        default_type application/octet-stream;

        access_log /var/log/nginx/access.log;
        error_log /var/log/nginx/error.log;

        include /etc/nginx/conf.d/*.conf;
        include /etc/nginx/sites-enabled/*;
}
Step 2: Verify the NGINX Configuration
Run the below command to check the NGINX configuration.
sudo nginx -tIf the above commands give OK, then run the below command to reload the nginx.
sudo nginx -s reloadSection 4: Validate the working of NGINX as a load balancer
Now we are in the final section where we will validate the working of NGINX as a load balancer.
Since we configured port 83 for the loadbalancer to listen, this port must be allowed (inbound) in the network of Server-2/Linux machine 2.
Once the port is allowed, try to access the below URL (replace the server IP with your IP address).
http://server-2-ip:83Now, coming to load balancing methods, NGINX by default uses a “round-robin” fashion to forward the traffic to the backend servers. In our loadbalancer.conf file we have not mentioned anything regarding this load balancing method, so by default, it will choose the “round-robin” method.
Thank you.
If you are interested in learning DevOps, please have a look at the below articles, which will help you greatly.
- Basics of automation using Ansible | Automate any task
- Automation of Java installation – using Ansible
- Automation of Tomcat installation – using Ansible
- 10 frequently used ansible modules with example
- Jenkins Pipeline as code – High level information
- Jenkins pipeline script to build Java application and push artifacts into repository
- Jenkins pipeline script to build & deploy application on web server
- What is End-to-End Monitoring of any web application, and Why do we need it?
- What is “Monitoring” in DevOps? Why do we need to Monitor App/DB servers, Transactions etc.?
- DevOps Engineer or Software Developer Engineer which is better for you?- Let’s discuss
- How To Be A Good DevOps Engineer?
- How to do git push, git pull, git add, git commit etc. with Bitbucket