
Last Updated on June 5, 2025 by cscontents
Introduction
Docker container engine is one of the most popular container engines. Container provides you a way to run your application using minimal resources with proper isolation. Also, container technology makes your application portable. To explain this portability, which means developers can easily hand over the application to the operations
In this article we will see how to write Dockerfile. Before we go to the section “How to write Dockerfile” let’s see a little bit about docker.
What is Docker? What is a Docker Container?
Docker is a software platform which allows us to deploy software in packages. These packages are called docker containers. Docker uses OS-level virtualization to achieve this.
How to run your application as Docker container?
Below are the high-level steps starting from development to deployment to run your application as docker container –
- Develop your application.
- Build the application.
- Write a Dockerfile which will include all the dependency software.
- Create a docker image using that Dockerfile.
- Deploy container using that image.
If you want to learn how to run an application as a docker container, then please head over to the article below. This article provides a complete step-by-step guide on this.
Docker installation and sample application deployment
What is a Dockerfile?
Basically, it is a text file (which doesn’t have any extension) with the name “Dockerfile”. It contains some commands or instructions to set up the required environment to run your application. And these commands need to be placed in the right order.
For example, you have a Java application, and it runs on JBoss EAP. So, in your Dockerfile you need to add command to add JBoss EAP & its prerequisite Java.
Layer Architecture of docker image
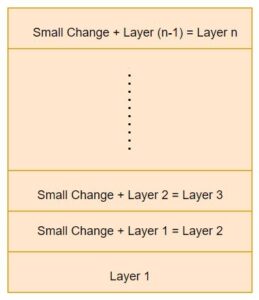
Docker images are basically a kind of template which we use to run containers. In other words, we can say docker containers are the running version of the docker image.
Now, this is very important to understand that docker images are layered architecture. Each command in Dockerfile will create a new layer. The first command in Dockerfile will create a base layer and when we run the second command it will create another layer which will include the changes done by both the first command & second command. In this way it will continue. The final layer or the top layer will have all the changes or software packages which are mentioned in the Dockerfile.
How to write a Dockerfile?
<Your DOCKER_INSTRUCTION> <arguments>
DOCKER_INSTRUCTION is the instruction or command that is specific to Docker, and arguments will be based on the base OS image.
For example,
RUN mkdir test
Here, RUN is the DOCKER_INSTRUCTION and ‘mkdir test’ is the argument.
Below are some of the DOCKER_INSTRUCTION,
FROM: It initializes the docker image build and sets the base image.
RUN: It is used to execute any command.
CMD: It provides defaults for an executing container. In a Dockerfile there can be only one CMD instruction. In case of multiple CMD instructions, only the last one will produce the effect. CMD is different from RUN, it doesn’t execute anything at build time.
ENTRYPOINT: It allows us to configure a container which will run as an executable.
WORKDIR: It is used to set the working directory, so that RUN, CMD, COPY etc. instruction can be executed in that directory.
COPY: IT copies files from a directory of your local machine (source) to the file system of the docker container (destination).
ADD: It copies files, folders, remote URL from your local machine to the file system of docker containers. ADD can copy content from remote URL, whereas COPY can’t do this. It is recommended to use curl and wget to fetch content from remote URL instead of using ADD. Since using ADD it will add the remote files into the file system of the container. On the other hand, if we use curl/wget then we can easily remove them.
EXPOSE: It is used to update the container to listen on the specified network ports at runtime.
ENV: This is used to set environment variables.
For a better and deeper understanding of the Docker instructions & their usage, it is highly recommended to go through the official documentation below.
https://docs.docker.com/engine/reference/builder/
Note: Dockerfile must start with ‘FROM’ instruction.
These “DOCKER_INSTRUCTION” are case-insensitive.
Let’s see an example Dockerfile to get some feel about it. Below is an example Dockerfile.
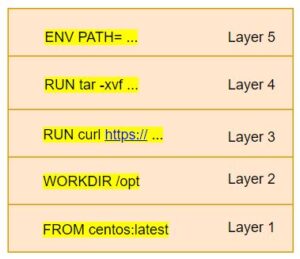
FROM centos:latest
WORKDIR /opt
RUN curl https://download.java.net/java/GA/jdk18.0.2.1/db379da656dc47308e138f21b33976fa/1/GPL/openjdk-18.0.2.1_linux-x64_bin.tar.gz --output openjdk-18.0.2.1_linux-x64_bin.tar.gz
RUN tar -xvf openjdk-18.0.2.1_linux-x64_bin.tar.gz && \
    rm -rf openjdk-18.0.2.1_linux-x64_bin.tar.gz
ENV PATH=$PATH:/opt/jdk-18.0.2.1/bin
At a high level, the above Dockerfile will create a Docker image of CentOS with Java. Let’s try to understand what each command/instruction is doing –
FROM centos:latest – This command will pull the CentOS latest image. This will work as base image, and this will create the 1st layer.
WORKDIR /opt – This command will take us to the /opt directory. Running this command ensures that we are currently in the/opt directory.
RUN curl https://download.java.net/java/GA/jdk18.0.2.1/db379da656dc47308e138f21b33976fa/1/GPL/openjdk-18.0.2.1_linux-x64_bin.tar.gz –output openjdk-18.0.2.1_linux-x64_bin.tar.gz – This command uses curl to download the JDK binaries from the URL.
rm -rf openjdk-18.0.2.1_linux-x64_bin.tar.gz
The above commands unzip the downloaded JDK file, and after unzipping it, remove the original file (.tar.gz file) to free up space.
ENV PATH=$PATH:/opt/jdk-18.0.2.1/bin – This command will update the PATH variable with the Java home path.
This is all for now.
Thank You.
If you are interested in learning DevOps, please have a look at the below articles, which will help you greatly.
- Kubernetes Series: Part 1 – Introduction to Kubernetes | Background of Kubernetes
- Kubernetes Series: Part 2 – Components of Kubernetes cluster | Kubernetes cluster in detail
- Kubernetes Series: Part 3 – What is Minikube and How to create a Kubernetes cluster (on Linux) using Minikube?
- Introduction to Azure DevOps – High level information
- Introduction to Ansible | High Level Understanding of Ansible
- Basics of automation using Ansible | Automate any task
- 10 frequently used ansible modules with example
- Jenkins Pipeline as code – High level information
- What is End-to-End Monitoring of any web application and Why do we need it?
- DevOps Engineer or Software Developer Engineer which is better for you?- Let’s discuss
- How To Be A Good DevOps Engineer?
- How to do git push, git pull, git add, git commit etc. with Bitbucket