
Last Updated on June 5, 2024 by cscontents
Introduction
Spinnaker is an open-source Continuous Delivery (CD) platform or tool that helps us orchestrate multi-cloud deployments with ease. Using Spinnaker we can increase the speed of software delivery. For this, we will be using Minikube, a lightweight Kubernetes distribution using which we can create a one-node Kubernetes cluster (for development and testing purposes).
In this article, we’ll see how to deploy Spinnaker in a Minikube. Using minikube we can easily create a one-node Kubernetes cluster. If you have access to AWS EKS, AKS, GKE, etc. then it is fine, otherwise you can keep up your leaning with minikube.
Note:
If you want to install Spinnaker on a VM, please follow this article – https://cscontents.com/how-to-install-spinnaker/
High-Level Steps to Install and Configure Spinnaker
Below is a simple flow diagram to simply the installation of Spinnaker.
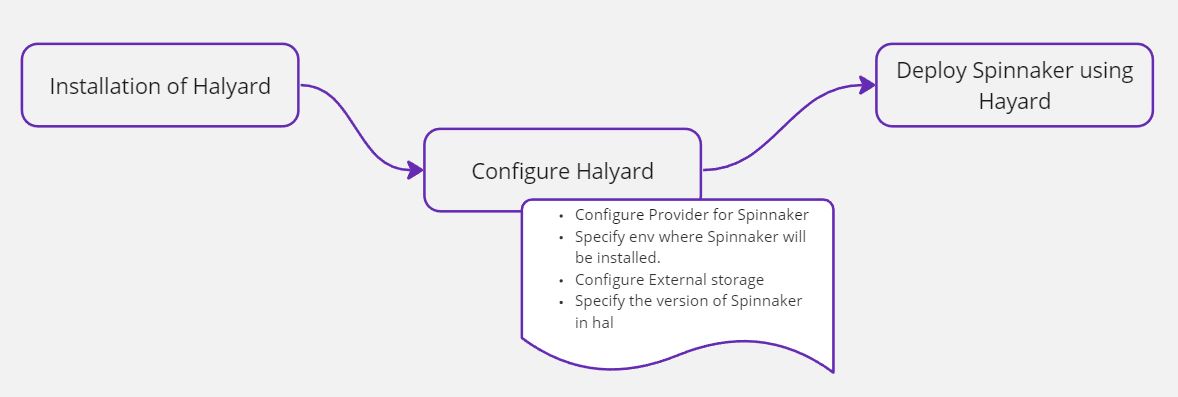
- Section 1: Installation of Halyard
- In this section, we will install Halyard, which is a command line tool. Spinnaker deployment and configuration are managed using Halyard. Installation of Spinnaker can be done without using Halyard, but it is recommended to use Halyard to install Spinnaker. There are two ways Halyard can be installed.
- Installing locally on a Debian/Ubuntu machine.
- Running as a docker container.
- In this section, we will install Halyard, which is a command line tool. Spinnaker deployment and configuration are managed using Halyard. Installation of Spinnaker can be done without using Halyard, but it is recommended to use Halyard to install Spinnaker. There are two ways Halyard can be installed.
- Section 2: Configure Halyard
- Configure Halyard with the Provider/Platform for Spinnaker – In Spinnaker “provider” is the platform (e.g., AWS, Azure, GCE, Kubernetes, etc.) on which applications will be deployed by the Spinnaker. In this step, the credentials of the target platform are configured in Spinnaker. Those credentials of the target platform are called “Accounts” in Spinnaker. Spinnaker uses those credentials (or Account information) to deploy applications into that platform. Below is the list of supported providers.
-
- Configure Halyard to specify in what type of environment Spinnaker will be installed – the recommended environment is “distributed” for Kubernetes. Distributed installations are for those who deal with large resource footprints and can’t afford downtime during updates of Spinnaker. Below are the supported methods –
- Distributed installation for Kubernetes
- Local installations in Debian packages
- Local git installations from GitHub
- Configure External Storage or Persistent Storage for Spinnaker – in Spinnaker we need to configure some external storage (persistent) where Spinnaker will be storing application settings and configured pipelines. Below are the supported storage solutions.
- Azure Storage
- Google Cloud Storage
- Minio (Minio’s data on the disk/drive of host machine should be kept safely)
- Redis (Redis is not recommended for production environments)
- S3
- Oracle Object Storage
- Choose the Spinnaker version to be installed – here, we specify which version of Spinnaker will be installed by the Halyard (hal).
- Configure Halyard to specify in what type of environment Spinnaker will be installed – the recommended environment is “distributed” for Kubernetes. Distributed installations are for those who deal with large resource footprints and can’t afford downtime during updates of Spinnaker. Below are the supported methods –
- Section 3: Deploy Spinnaker
- In this section, Spinnaker is deployed using Halyard (hal). In section 2, hal is configured with all the required information.
- Finally, we need to verify the Spinnaker installation. For this, we can check the Spinnaker pods or services.
Prerequisites for this Guide
To complete this guide, you need to fulfill the below prerequisite.
- One Linux machine is required – in our case, we will be using a Ubuntu machine.
- Minikube Cluster – In this guide, we will be installing Spinnaker in a Minikube cluster. In our case, we will be using Minikube cluster that is installed on an Ubuntu machine.
- MinIO (persistent storage) – we will be using MinIO as a persistent storage solution instead of any cloud-provided storage solution. In our case, we will be installing MinIO on the same host machine (Ubuntu) where minikube is installed.
Minikube Cluster Creation
Minikube cluster (a one-node Kubernetes cluster) is a good option for development, testing & learning purposes.
The below article has a step-by-step guide to installing minikube,
https://cscontents.com/what-is-minikube-and-how-to-create-kubernetes-cluster-using-minikube/
Special Note: Since in this guide we will be deploying Spinnaker in the minikube cluster, so we need to start the minikube with sufficient CPU and RAM so that Spinnaker can run in the minikube cluster smoothly.
The recommendation is, running minikube cluster with 4 CPU and 8 GB of RAM.
If you have followed the above article, please come back here, and start you minikube cluster using the below command.
minikube start --cpus 4 --memory 8192MinIO Installation
We will be using MinIO as a persistent storage solution for Spinnaker, MinIO will be used by the Spinnaker to store application settings and pipeline configuration related data. Follow the below article to install MinIO on an Ubuntu machine.
https://cscontents.com/how-to-install-minio-on-linux/
Spinnaker Installation on Kubernetes (Minikube)
Below is the practical implementation of the above high-level steps. Follow the steps mentioned below in the same order to install Spinnaker on minikube. We suggest you please go through the above high level steps to get good understanding of the installation process before moving to the practical section.
Section 1: Installation of Halyard
Follow the below steps to install Halyard on the host machine (Ubuntu) where minikube cluster is running.
Step 1: Download the Halyard installation script
Execute the below curl command to download the script.
curl -s -O https://raw.githubusercontent.com/spinnaker/halyard/master/install/debian/InstallHalyard.shStep 2: Install Halyard (hal)
In this step we install Halyard by using the downloaded script.
sudo bash InstallHalyard.shStep 3: Verify the installation of Halyard
Execute the below command to check the version of halyard (hal).
hal -vOutput:
1.63.0You can check the status of Halyard (hal) by running the below command.
sudo service halyard statusIf you see halyard is not running or status is inactive, then you can run the below command to start the halyard.
sudo service halyard startSection 2: Configure Halyard (hal) to install Spinnaker
In this section, we will configure halyard to install Spinnaker.
Step 1: Create a Service Account and Token in the target Kubernetes cluster
In our case, we plan to deploy application in the same minikube cluster where Spinnaker will be deployed. So, we will create a service account and token for that account in that minikube cluster.
Step 1.1: Create a Namespace
Creating namespace in the target Kubernetes cluster is the first step. Execute the below command to create a namespace. We will call it “spinnaker”.
kubectl create ns spinnakerOutput:
namespace/spinnaker createdStep 1.2: Create a Service Account
In this step we will create a service account. We will create this service account using YAML manifest file.
Run the below command to create a new YAML file in the editor.
vi spinnaker-account.yamlCopy and paste the below content in the spinnaker-account.yaml file.
apiVersion: v1
kind: ServiceAccount
metadata:
  name: spinnaker-account
  namespace: spinnaker
Finally, save that file and run the below command.
kubectl apply -f spinnaker-account.yamlOutput:
serviceaccount/spinnaker-account createdTo validate the service account creation, execute the below command.
kubectl get serviceaccounts -n spinnakerOutput:
NAME                SECRETS   AGE
default             0         3m54s
spinnaker-account   0         57s
Step 1.3: Create a Token for the Service Account
In the previous step we have created a service account. Now we need to create a secret/token for that service account. We will do it using a YAML manifest file.
Run the below command to open a new file in the editor.
vi spinnaker-account-token.yamlCopy & paste the below content in that file.
apiVersion: v1
kind: Secret
metadata:
  namespace: spinnaker
  name: spinnaker-account-token
  annotations:
    kubernetes.io/service-account.name: spinnaker-account
type: kubernetes.io/service-account-token
Finally save the file and run the below command to apply it to create the secret.
kubectl apply -f spinnaker-account-token.yamlOutput:
secret/spinnaker-account-token createdTo validate the creation of secret, run the below command.
kubectl get secrets -n spinnakerOutput:
NAME                      TYPE                                  DATA   AGE
spinnaker-account-token   kubernetes.io/service-account-token   3      38s
Step 2: Add Provide/Platform in Halyard and configure credentials
In our case we want our Spinnaker to deploy applications in the same Kubernetes cluster (minikube) where it will be running.
hal config provider kubernetes enableOutput:
+ Get current deployment
  Success
+ Edit the kubernetes provider
  Success
Validation in default:
- WARNING You have not yet selected a version of Spinnaker to
  deploy.
? Options include:
  - 1.33.0
  - 1.32.4
  - 1.31.3

Validation in default.provider.kubernetes:
- WARNING Provider kubernetes is enabled, but no accounts have been
  configured.

+ Successfully enabled kubernetes
Now, we need to add an account using which Spinnaker will be able to connect with the provider/platform and deploy application.
Lets call account name as “spinnaker-account”.
hal config provider kubernetes account add spinnaker-account --context $(kubectl config current-context)Output:
+ Get current deployment
  Success
+ Add the spinnaker-account account
  Success
Validation in default:
- WARNING You have not yet selected a version of Spinnaker to
  deploy.
? Options include:
  - 1.33.0
  - 1.32.4
  - 1.31.3

+ Successfully added account spinnaker-account for provider
  kubernetes.
The below command will list the service account configured in hal.
hal config provider kubernetes account listNote: If due to any unexpected reason you have to delete that account for troubleshooting any issue, in that case you can run the below command to delete that added account from hal.
hal config provider kubernetes account delete <account-name>Step 3: Configure Halyard to specify the environment in which Spinnaker will be installed
We will be using “distributed” environment which is the recommended for installing Spinnaker in Kubernetes.
Execute the below command,
hal config deploy edit --type distributed --account-name spinnaker-accountOutput:
+ Get current deployment
  Success
+ Get the deployment environment
  Success
+ Edit the deployment environment
  Success
Validation in default:
- WARNING You have not yet selected a version of Spinnaker to
  deploy.
? Options include:
  - 1.33.0
  - 1.32.4
  - 1.31.3

+ Successfully updated your deployment environment.
Step 4: Configure External storage (persistent storage) for Spinnaker
For this installation we will be using MinIO as a persistent storage solution for Spinnaker. MinIO is AWS s3 equivalent object storage.
In the above prerequisite section, we have already discussed on how to install MinIO on local Ubuntu machine. If you are planning to use MinIO, please make sure your MinIO server is up & running.
If you have installed MinIO by following this article -> MinIO installation, you check the /etc/default/minio file, there we have two parameters –
- MINIO_ROOT_USER – it is equivalent to “
access-key-id” of MinIO - MINIO_ROOT_PASSWORD – it is equivalent to
"secret-access-key"of MinIO
In our case,
MINIO_ROOT_USER is “minioadmin”.
MINIO_ROOT_PASSWORD is “miniopassword”.
Endpoint is http://22.99.204.74:9000. Here, we are using public IP of that machine where MinIO is installed.
Now, we need to run the below command to provide “access-key-id”, “secret-access-key” and “endpoint”.
hal config storage s3 edit --access-key-id minioadmin --secret-access-key --endpoint http://22.99.204.74:9000In our case,
- access-key-id: We are passing it in the command.
- secret-access-key: we are passing it via STDIN for security reason, it is better not to hardcode the secret-access-key in the CLI command.
- endpoint:
http://22.99.204.74:9000
Once we run the above command, it will ask for entering the “AWS Secret Key”, there you need to enter the minio secret-access-key and press “Enter”.
Output:
Your AWS Secret Key.:
+ Get current deployment
  Success
+ Get persistent store
  Success
Generated bucket name: spin-b637fc83-9816-45a5-933a-d7c49849f9ab
+ Edit persistent store
  Success
Validation in default.persistentStorage:
- WARNING Your deployment will most likely fail until you configure
  and enable a persistent store.

Validation in default:
- WARNING You have not yet selected a version of Spinnaker to
  deploy.
? Options include:
  - 1.33.0
  - 1.32.4
  - 1.31.3

+ Successfully edited persistent store "s3".
In the above, we have edited the s3 configuration in hal.
Now, we need to specify s3 as persistent storage in the hal configuration. For this run the below command.
hal config storage edit --type s3Output:
+ Get current deployment
  Success
+ Get persistent storage settings
  Success
+ Edit persistent storage settings
  Success
Validation in default:
- WARNING You have not yet selected a version of Spinnaker to
  deploy.
? Options include:
  - 1.33.0
  - 1.32.4
  - 1.31.3

+ Successfully edited persistent storage.
Step 5: Choose the Spinnaker version
In this step, we will specify which version of Spinnaker we want to install using Halyard (hal).
Execute the below command to check the available Spinnaker version.
hal version listOutput:
+ Get current deployment
  Success
+ Get Spinnaker version
  Success
+ Get released versions
  Success
+ You are on version "", and the following are available:
 - 1.31.3 (v1.31.3):
   Changelog: https://spinnaker.io/changelogs/1.31.3-changelog/
   Published: Tue Nov 28 08:09:43 UTC 2023
   (Requires Halyard >= 1.45)
 - 1.32.4 (v1.32.4):
   Changelog: https://spinnaker.io/changelogs/1.32.4-changelog/
   Published: Fri Mar 08 22:37:49 UTC 2024
   (Requires Halyard >= 1.45)
 - 1.33.0 (v1.33.0):
   Changelog: https://spinnaker.io/changelogs/1.33.0-changelog/
   Published: Fri Jan 05 05:59:53 UTC 2024
   (Requires Halyard >= 1.45)
We will install Spinnaker version 1.31.3
As mentioned in the output for version 1.31.3, it requires Halyard >= 1.45
In our case, Halyard version is 1.63.0
Now, execute the below command to set the Spinnaker version.
hal config version edit --version 1.31.3Output:
+ Get current deployment
  Success
+ Edit Spinnaker version
  Success
+ Spinnaker has been configured to update/install version "1.31.3".
  Deploy this version of Spinnaker with `hal deploy apply`.
Section 3: Deploy Spinnaker
In this section we will deploy Spinnaker using hal.
Step 1: Deploy Spinnaker using hal
Before deploying Spinnaker using hal, please change the ownership of the ~/.kube/config file and files under ~/.minikube/profiles/minikube/ directory.
chmod 777 ~/.kube/configand
chmod -R 777 ~/.minikube/profiles/minikube/Execute the below command to deploy Spinnaker.
hal deploy applyOutput:
+ Get current deployment
  Success
+ Prep deployment
  Success
Validation in default.stats:
- INFO Stats are currently ENABLED. Usage statistics are being
  collected. Thank you! These stats inform improvements to the product, and that
  helps the community. To disable, run `hal config stats disable`. To learn more
  about what and how stats data is used, please see
  https://spinnaker.io/docs/community/stay-informed/stats.

Validation in default.security:
- WARNING Your UI or API domain does not have override base URLs
  set even though your Spinnaker deployment is a Distributed deployment on a
  remote cloud provider. As a result, you will need to open SSH tunnels against
  that deployment to access Spinnaker.
? We recommend that you instead configure an authentication
  mechanism (OAuth2, SAML2, or x509) to make it easier to access Spinnaker
  securely, and then register the intended Domain and IP addresses that your
  publicly facing services will be using.

+ Preparation complete... deploying Spinnaker
+ Get current deployment
  Success
- Apply deployment
+ Apply deployment
  Success
+ Deploy spin-redis
  Success
+ Deploy spin-clouddriver
  Success
+ Deploy spin-front50
  Success
+ Deploy spin-orca
  Success
+ Deploy spin-deck
  Success
+ Deploy spin-echo
  Success
+ Deploy spin-gate
  Success
+ Deploy spin-rosco
  Success
+ Run `hal deploy connect` to connect to Spinnaker.
Step 2: Connect with Spinnaker (or) Access Spinnaker UI
In the previous step, we successfully deployed spinnaker.
Now there are two cases.
Case 1:
You have deployed Spinnaker in any Kubernetes cluster which is running in any cloud platform. In that case, you will see external IP (loadbalancer IP) allocated to your Spinnaker services. To check the external IP of the Spinnaker services, run the below command,
kubectl get svc -n spinnakerOutput: In our case we deployed spinnaker on a minikube so it’s services does not have external IP.
NAME               TYPE        CLUSTER-IP       EXTERNAL-IP   PORT(S)    AGE
spin-clouddriver   ClusterIP   10.103.82.124    <none>        7002/TCP   122m
spin-deck          ClusterIP   10.110.85.201    <none>        9000/TCP   122m
spin-echo          ClusterIP   10.103.47.223    <none>        8089/TCP   122m
spin-front50       ClusterIP   10.103.89.169    <none>        8080/TCP   122m
spin-gate          ClusterIP   10.96.183.206    <none>        8084/TCP   122m
spin-orca          ClusterIP   10.107.67.149    <none>        8083/TCP   122m
spin-redis         ClusterIP   10.105.235.249   <none>        6379/TCP   122m
spin-rosco         ClusterIP   10.105.194.10    <none>        8087/TCP   122m
Case 2:
Now, if we want to access the Spinnaker from localhost (where Halyard or hal is running), then we need to run the below ‘hal deploy connect’ command. It will connect the Halyard or hal (Spinnaker CLI tool) with the Spinnaker services (that are running inside the kubernetes cluster).
sudo hal deploy connectOutput:
+ Get current deployment
  Success
+ Connect to Spinnaker deployment.
  Success
Forwarding from 127.0.0.1:8084 -> 8084
Forwarding from 127.0.0.1:9000 -> 9000
Forwarding from [::1]:8084 -> 8084
Forwarding from [::1]:9000 -> 9000
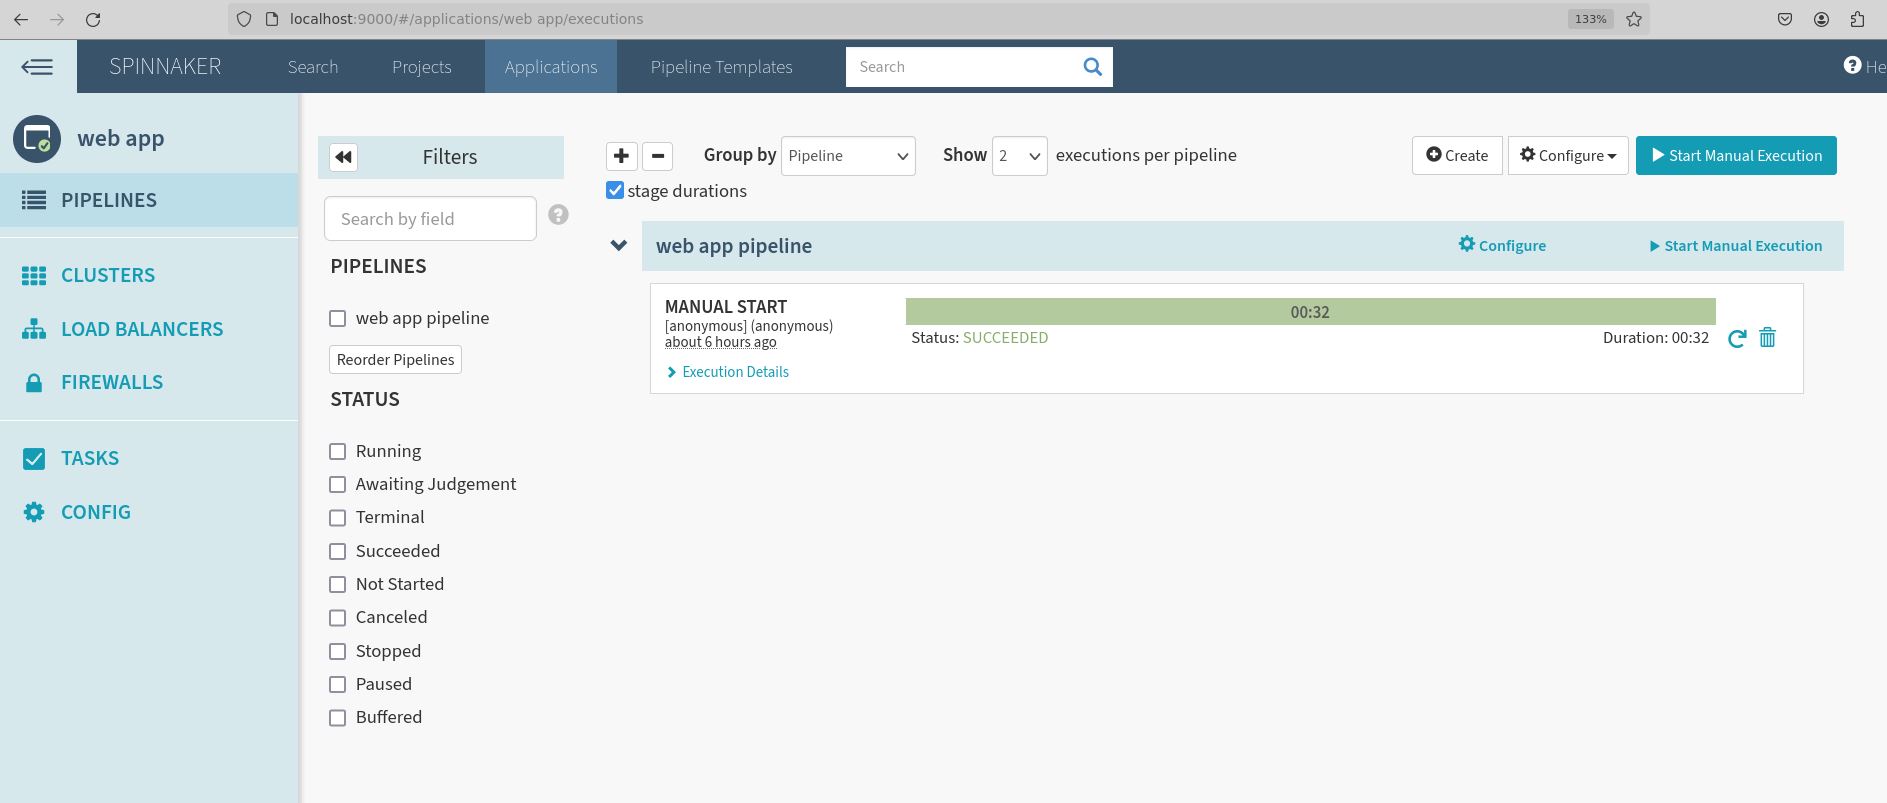
Spinnaker has various components, among all those components Deck and Gate are two crucial components.
- Deck is the UI component of Spinnaker. It uses port 9000.
- Gate is the API Gateway of Spinnaker. It uses port 8084.
In our case, we have GUI installed in the Ubuntu machine (where Halyard or hal is running), so we are able to access the Spinnaker UI using the browser of the same machine.
Step 3: Check the Spinnaker Pods for validation (Optional)
In the previous steps, we have deployed and connected with Spinnaker. For validation purpose, we will check the deployed spinnaker pods.
To get Spinnaker pods,
kubectl get pods -n spinnakerOutput:
NAME                               READY   STATUS    RESTARTS        AGE
spin-clouddriver-99566fc5b-4jwgs   1/1     Running   0               119s
spin-deck-6589bff876-s99t2         1/1     Running   1 (4m44s ago)   118m
spin-echo-59ff774c5f-7974m         1/1     Running   1 (29m ago)     118m
spin-front50-5dcc747858-br9dv      1/1     Running   1 (29m ago)     66m
spin-gate-5d475c7696-dcklz         1/1     Running   1 (29m ago)     118m
spin-orca-6c4f9dc785-q8j24         1/1     Running   1 (29m ago)     118m
spin-redis-c798c5c7c-pvsbx         1/1     Running   1 (29m ago)     118m
spin-rosco-7c78d88d8d-vtc2r        1/1     Running   1 (29m ago)     118m
Conclusion
Finally, in this step by step guide we have seen how to deploy spinnaker in Kubernetes. For this demo, we have used a minikube cluster. You can use same the steps to deploy spinnaker in other Kubernetes cluster. Just try to understand the high level installation flow first and then go through the steps one by one.
Reference Documents
- https://spinnaker.io/docs/setup/install/providers/kubernetes-v2/aws-eks/
- https://spinnaker.io/docs/setup/install/storage/
- https://spinnaker.io/docs/setup/install/storage/minio/
- https://cscontents.com/how-to-install-spinnaker/
Thank you.
If you are interested in learning DevOps, please have a look at the below articles, which will help you greatly.
- How to install Spinnaker on VM – Step by Step Practical Guide
- Kubernetes Series: Part 1 – Introduction to Kubernetes | Background of Kubernetes
- Kubernetes Series: Part 2 – Components of Kubernetes cluster | Kubernetes cluster in detail
- Kubernetes Series: Part 3 – What is Minikube and How to create a Kubernetes cluster (on Linux) using Minikube?
- Introduction to Azure DevOps – High-level information
- Introduction to Ansible | High-Level Understanding of Ansible
- Basics of automation using Ansible | Automate any task
- 10 frequently used Ansible modules with example
- Jenkins Pipeline as code – High-level information
- What is End-to-End Monitoring of any web application and Why do we need it?
- DevOps Engineer or Software Developer Engineer which is better for you?- Let’s discuss
- How To Be A Good DevOps Engineer?
- How to do git push, git pull, git add, git commit, etc. with Bitbucket