
Last Updated on February 18, 2023 by cscontents
Introduction
Jenkins pipeline as code is one of the way best of writing/ creating Jenkins pipeline. It gives us lot of flexibility. Also, we can reuse Jenkins pipeline script. In this article we will discuss deployment of a sample Java application on Kubernetes platform. We will use AKS (Azure Kubernetes Service) as Kubernetes platform.
Here we are going to automate the deployment process using CI/CD pipeline. We will use Jenkins as pipeline tool. And we will use Jenkins declarative pipeline script to achieve the goal.
Prerequisite
To complete this tutorial, you’ll need the below:
Prerequisite knowledge
- Git, GitHub, maven
- Docker, Docker hub
- Docker image build, push, pull
- Kubernetes platform – AKS (Azure Kubernetes Service)
Prerequisite setup
- You should have Jenkins installed on a Linux machine, and it is up & running. Also, Jenkins dashboard should be accessible from your browser.
- We will use a maven project, so we need maven to be installed on the Jenkins machine and MAVEN_HOME path should be set properly.
- On the same machine where Jenkins is installed, docker should be installed.
- In this tutorial we are using AKS, if you don’t have an AKS cluster, then any other Kubernetes platform (e.g., EKS, GKE etc.) will also work.
- You will need a Java project (or source code of Java-based application) on GitHub.
- You will need a Docker hub account. In this tutorial we used Docker hub to store the images.
If you want to learn Jenkins, Docker, Kubernetes etc., then I would recommend to check out the below courses from KodeKloud which offers one of the best learning courses in the DevOps world.
Jenkins Course URL: https://kodekloud.com/courses/jenkins/?aff=827846
Docker Learning Path: https://kodekloud.com/learning-path-docker/?aff=827846
Kubernetes with Hands-on Course URL: https://kodekloud.com/courses/kubernetes-for-the-absolute-beginners-hands-on/?aff=827846
Note: The above links are affiliate links, if you enroll this course using the above link, then it would help us to get some monetary benefit from KodeKloud. It won’t cost you anything.
Tools/Technology used in this tutorial
Below are the tools/technology used –
- Git, GitHub
- Jenkins
- Docker
- Azure Kubernetes Service (AKS)
Step by Step guide
Below is the step by step guide.
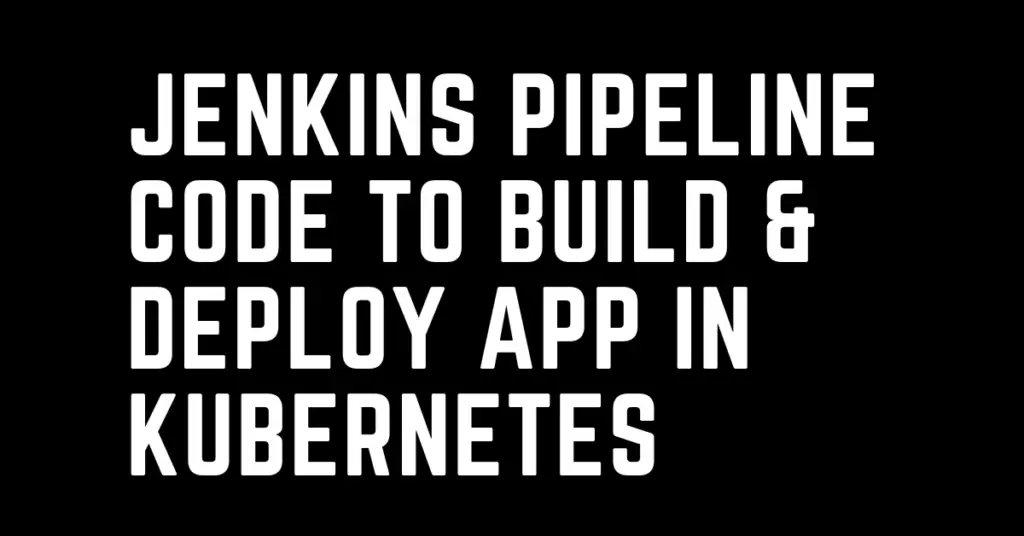
Step 1 – Getting Visual Idea about the Pipeline
There are multiple ways through which we can achieve this build and deployment of application. We have chosen one of the ways which gives comparably lower cost.
In our case we have installed docker on the same machine where Jenkins is running instead of installing it on a separate machine.
Though we thought about one issue which is building docker image on the Jenkins machine can bring memory outage issue on Jenkins machine, but we found a solution which is by deleting the image once it is pushed into Docker hub. So, we have ensured no impact on Jenkins due to docker.
If you don’t want to install docker on the Jenkins machine, then you install it on a separate machine. In this case you need to send the build artifacts (e.g., war file) to the docker host over SSH and execute the docker commands to build the docker image & push it into Docker hub.
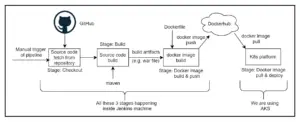
Step 2 – Configure Jenkins with JAVA_HOME, MAVEN_HOME
Configure the JAVA_HOME, MAVAN_HOME path under the “Global Tool Configuration” of Jenkins. To get the JAVA_HOME & MAVEN_HOME path, you need to run the below echo commands.
echo $JAVA_HOME
echo $MAVEN_HOME
If need go to, Manage Jenkins -> Global Tool Configuration

Step 3 – Configure repository credential with Jenkins
There are two repository which below –
- Source code repository – for this we are using GitHub
- Docker image repository – for this we are using docker hub.
We need to configure the credentials of above mentioned repositories.
- If you are using any private source code repository, then you need to add a credential with access credential/token. In our case our source code repository is GitHub, so we have added a credential with GitHub token.
- Since from Jenkins we will push the docker image to Docker hub, so we need to add a credential with Docker hub username & password (if you don’t have a Docker hub account, then you need to create one).
Step 4 – Install Jenkins Plugin to integrate Kubernetes with Jenkins
There could be multiple ways through which we can integrate Kubernetes with Jenkins. But in this tutorial, we are using two Jenkins plugins to integrate Jenkins with Kubernetes.
Once you are done with the installation, you need to restart the Jenkins.
In the next step we will integrate Kubernetes with Jenkins.
Step 5 – Integrate Kubernetes with Jenkins
We need to ensure communication between Jenkins & Kubernetes platform. For this follow the below steps –
- You need to access your Kubernetes cluster using CLI interface and from the .kube directory there is one file with name kubeconfig
- Copy the content of kubeconfig file and paste it in one text file in your local desktop.
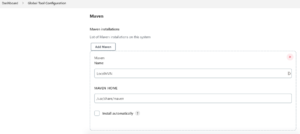
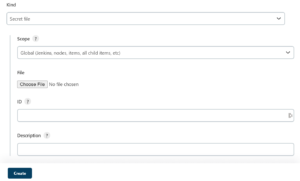
- In Jenkins dashboard, go to the credential section (Manage Jenkins -> Manage Credentials), and add a new credential with the type “secret file”.
- In the “Choose File” option select that kubeconfig file from your Desktop and enter an ID (which will be used in the Jenkins pipeline script).
Step 6 – Prepare Dockerfile
We need to create a Dockerfile so that docker engine can use the Dockerfile to create a docker image. Below is the content of Dockerfile
FROM tomcat:latest
RUN cp -R  /usr/local/tomcat/webapps.dist/*  /usr/local/tomcat/webapps
COPY ./target/*.war /usr/local/tomcat/webapps
Explanation of Dockerfile
Below are the steps mentioned in Dockerfile –
- At first it will pull the latest tomcat image (official)
- Next, it will copy the content of CATALINA_HOME/webapps.dist/ to CATALINA_HOME/webapps directory. Follow the documentation given in Dockerhub -> https://hub.docker.com/_/tomcat for more details.
- Finally, it will copy the .war file which is the build artifact into webapps directory of tomcat.
And at the end we are copying the generated war file into the webapps directory of tomcat.
Step 7 – Prepare Kubernetes Manifest Files (YAML file)
Before we start our pipeline we need to be ready with Kubernetes manifest file. Here we will need below two manifest files.
- One manifest file to create a deployment object.
- Another manifest file to create a service object.
Note: you can have a single file with the content of both the files.
We will keep this file in the Jenkins server and put the file location in the pipeline script.
Deployment manifest file
We will deploy two pods of the application. In the below deployment YAML file you need to enter your image name with tag. Let’s name this file as webapp-deployment.yml
apiVersion: apps/v1
kind: Deployment
metadata:
  name: webapp-deployment
  labels:
     app: webapp
spec:
  replicas: 2
  selector:
    matchLabels:
      app: webapp

  template:
    metadata:
      labels:
        app: webapp
    spec:
      containers:
      - name: webapp
        image: <enter your image name>
        imagePullPolicy: Always
        ports:
        - containerPort: 8080
Service manifest file
Below is the service manifest file. Here we will create a load balancer type service. Let’s name this file as webapp-service.yml
apiVersion: v1
kind: Service
metadata:
  name: webapp-service
  labels:
    app: webapp
spec:
  selector:
    app: webapp

  ports:
    - port: 8080
      targetPort: 8080
  type: LoadBalancer
Step 8 – Prepare Jenkins Pipeline Script
We are using Jenkins pipeline as code (declarative type). Below is the Jenkins declarative pipeline script.
pipeline {
    agent any
    tools {
        maven "LocalMVN"
    }
    stages {
        stage('Checkout') {
            steps {
              withCredentials([string(credentialsId: 'GitHub_Token', variable: 'github_token')]) {
                checkout([$class: 'GitSCM',
                          branches: [[name: '*/master']],
                      extensions: [[$class: 'CleanCheckout']],
                      userRemoteConfigs: [[url: 'https://' + env.github_token + '@' + 'github.com/sk617/WebApp.git']]

             ])
              }
            }
        }
        stage('Build') {
            steps {
                // Run Maven on a Unix agent.
                sh "mvn -Dmaven.test.failure.ignore=true clean package"
            }
        }
        stage('docker build & push') {
          steps {
            withCredentials([usernamePassword(credentialsId: 'dockerhubID', usernameVariable: 'USERNAME', passwordVariable: 'PASSWORD')]) {
            sh 'docker build -t webapp-image:v1 .'
            sh 'docker tag webapp-image:v1 ' +  USERNAME + '/webapp-image:v1'
            sh 'docker login -u ' + USERNAME + ' -p ' + PASSWORD
            sh 'docker push ' + USERNAME + '/webapp-image:v1'
            sh 'docker rmi -f $(docker images -a -q ' + USERNAME + '/webapp-image:v1)'

            }
          }
        }
        stage('Deploy app on K8s') {
          steps{
            withKubeConfig([credentialsId: 'my-AKS-cred']) {
              sh 'kubectl apply -f $JENKINS_HOME/workspace/webapp-deployment.yml'
              sh 'kubectl apply -f $JENKINS_HOME/workspace/webapp-service.yml'
            }
          }
        }
    }
}
Explanation of Jenkins pipeline stages
Stage: Checkout
In this stage source code will be fetched from source code repository.
Stage: Build
In this stage source code will be built using maven tool (Java project) and create some artifacts at the end of the build.
Stage: docker build & push
In this stage docker image will be built. For this we need a Dockerfile. We kept the Dockerfile in the root directory of our source code repository (GitHub). Once docker image is built, it is pushed into Docker hub.
Stage: Deploy app on K8s
In this pipeline will execute the ‘kubectl apply’ commands and it will use the manifest files. You can keep these manifest files (YAML) also in source code repository. In our case we kept them locally.
Thank You
If you are interested in learning DevOps, please have a look at the below articles, which will help you greatly.
- Kubernetes Series: Part 1 – Introduction to Kubernetes | Background of Kubernetes
- Kubernetes Series: Part 2 – Components of Kubernetes cluster | Kubernetes cluster in detail
- Kubernetes Series: Part 3 – What is Minikube and How to create a Kubernetes cluster (on Linux) using Minikube?
- Introduction to Ansible | High Level Understanding of Ansible
- Basics of automation using Ansible | Automate any task
- Automation of Java installation – using Ansible
- 10 frequently used ansible modules with example
- Jenkins Pipeline as code – High level information
- Jenkins pipeline script to build Java application and push artifacts into repository
- Jenkins pipeline script to build & deploy application on web server
- What is End-to-End Monitoring of any web application, and Why do we need it?
- What is “Monitoring” in DevOps? Why do we need to Monitor App/DB servers, Transactions etc.?
- DevOps Engineer or Software Developer Engineer which is better for you?- Let’s discuss
- How To Be A Good DevOps Engineer?
- How to do git push, git pull, git add, git commit etc. with Bitbucket