

Last Updated on April 19, 2024 by cscontents
Introduction
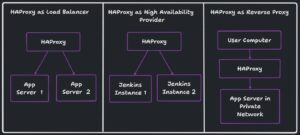
HAProxy is one of the most popular open-source software that is used for functionalities like,
- Software load balancer – as a load balancer it distributes the incoming traffic to various servers.
- High Availability – HAProxy or High Availability Proxy can provide high availability by providing a single user interface where multiple servers are serving the web page in the background. So, if any of the backend servers goes down the incoming traffic will be forwarded to the remaining working servers.
- Proxy – HAProxy is primarily used as a Reverse Proxy.
(Note: There are two types of proxy functionality, one is “Forward Proxy” and another is “Reverse Proxy”)
To know more detail about ‘Forward Proxy or Proxy’ and ‘Reverse Proxy’ you can follow the below article.
https://cscontents.com/proxy-server-and-reverse-proxy-server-and-load-balancer/
For better understanding let’s take an example problem statement.
Problem: High website traffic overwhelms servers, leading to slow performance and potential crashes.
Solution: HAProxy which is a load balancer that distributes incoming traffic across multiple servers. By distributing the traffic, it ensures the stability and responsiveness of the servers.
Benefits:
- Improved server performance: Reduced load on individual servers.
- Faster page load times: Users experience smoother website navigation.
- Enhanced scalability: Handles increased traffic without additional server resources like CPU & memory.
- Increased availability: HAProxy serves as a single point of entry, masking server failures.
For more detailed information you can follow the official documentation of HAProxy.
In this comprehensive guide, we will go through the installation of HAProxy, a step-by-step walkthrough that shows the process. Whether you’re a seasoned system administrator or a curious enthusiast eager to optimize your web application’s performance, this guide will help you in the installation of HAProxy and unlock the potential for enhanced scalability, reliability, and seamless traffic distribution in your infrastructure.
Prerequisite
Below are the prerequisites –
- Have a Linux machine on which HAProxy will be installed. On that machine one user should be created with proper sudo privileges so that software package can be installed.
- Having experience with Linux commands.
HAProxy Installation
HAProxy package is available for Linux, macOS, and FreeBSD Operating Systems. There is no HAProxy package available for Windows OS. Here we will focus on the installation of HAProxy on various Linux flavors.
HAProxy Installation on Ubuntu
Since HAProxy by default uses port 80, we should make sure port 80 should not be used by any other service in that Linux machine. Once we will install HAProxy in that machine it will automatically start listening to port 80.
Below are the steps that we need to follow to install HAProxy on Ubuntu.
Step 1: Update & Upgrade the Linux OS package
Update and upgrade the packages by running the below commands.
sudo apt update
sudo apt upgrade
Step 2: Install HAProxy
Install HAProxy by running the below command.
sudo apt install haproxy
Step 3: Check Status of HAProxy
Normally, on Ubuntu machine HAProxy automatically gets started after installation. So, check the status of HAProxy after installation.
systemctl status haproxy
If it shows haproxy is not running,
Then we can start the haproxy by running the below command.
sudo systemctl start haproxy
HAProxy Installation on CentOS / RHEL
Since HAProxy by default uses port 80, we should make sure port 80 should not be used by any other service in that Linux machine. Once we will install HAProxy in that machine it will automatically start listening to port 80.
Below are the steps that we need to follow to install HAProxy on CentOS or RHEL.
Step 1: Update Linux OS package
Update the package by running the below command.
sudo yum update -y
Step 2: Install HAProxy
Install HAProxy by running the below command.
sudo yum install haproxy -y
Step 3: Start HAProxy
By default, HAProxy might not be started in CentOS, so we can start it by running the below command.
sudo systemctl start haproxy
Step 4: Check Status of HAProxy
Check the status of HAProxy by running the below command.
systemctl status haproxy
Thank you.
If you are interested in learning DevOps, please have a look at the below articles, which will help you greatly.
- How to create ansible role for Java installation – a simple guide
- Kubernetes Series: Part 1 – Introduction to Kubernetes | Background of Kubernetes
- Kubernetes Series: Part 2 – Components of Kubernetes cluster | Kubernetes cluster in detail
- Kubernetes Series: Part 3 – What is Minikube and How to create a Kubernetes cluster (on Linux) using Minikube?
- Introduction to Ansible | High-Level Understanding of Ansible
- Basics of automation using Ansible | Automate any task
- 10 frequently used ansible modules with example
- Jenkins Pipeline as code – High-level information
- What is End-to-End Monitoring of any web application and Why do we need it?
- What is “Monitoring” in DevOps? Why do we need to Monitor App/DB servers, Transactions etc.?
- DevOps Engineer or Software Developer Engineer which is better for you?- Let’s discuss
- How To Be A Good DevOps Engineer?
- How to do git push, git pull, git add, git commit etc. with Bitbucket