

Last Updated on April 19, 2024 by cscontents
Introduction
HAProxy or High Availability Proxy is an open-source software that is widely used as a High Availability functionality provider. HA functionality is such a crucial functionality without which modern-day business applications/systems can’t think of going live.
To show the use of HAProxy as a High Availability provider we will do a demo project or a POC (proof of concept) where we are going to deploy two instances of a static application on the Apache HTTPD server and then configure HAProxy in front of them to work as a single point of access which will make the system highly available. It means if any of the application servers goes down HAProxy will route the incoming traffic request to the other application server. That means our system will be highly available.
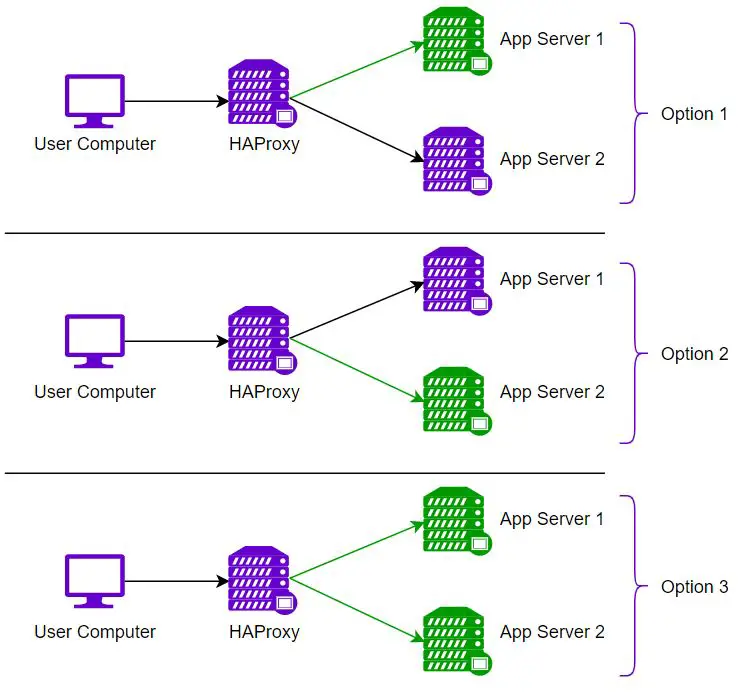
In this case, we have three options.
| Options | Application Instance 1 | Application Instance 2 | Comment |
| Option 1 | Active | Passive | In this mode of operation, app instance 1 is active and app instance 2 is passive. It means by default HAProxy will send the traffic to only app instance 1 and if app instance 1 goes down, then HAProxy will send traffic to app instance 2. |
| Option 2 | Passive | Active | In this mode of operation, app instance 1 is in passive mode, and app instance 2 is in active mode. It means by default HAProxy will send the traffic to only app instance 2 and if app instance 2 goes down, then HAProxy will send traffic to app instance 1. |
| Option 3 | Active | Active | In this mode of operation, both the app instances are active, and HAProxy will send the traffic request to both servers based on some method like round-robin, etc. |
Below is a pictorial representation of the above options.
Prerequisite
To complete this demo project, you need to have the below prerequisites.
- 3 Linux machines are required. We will be using 3 Ubuntu machines for this demo project.
- On 2 machines we will deploy 2 instances of a sample static application and
- On the 3rd machine, we will install HAProxy (with HA configuration).
- On all the machines, we need a non-root user with proper sudo privileges to perform the activity.
- Last but the least, this guide presumes you have experience with Linux commands.
Sections of this Guide
For simplicity, we have divided this guide into a few sections.
- Section 1: Installation of Apache HTTPD web server on 2 Linux machines.
- Section 2: Deployment of a sample web application (static) in the two web servers.
- Section 3: Installation of HAProxy on the 3rd server which will work as ‘High-Availability Provider’.
- Section 4: Configure HAProxy to provide high-availability functionality.
- Section 5: Test the whole system and validate the working HAProxy.
Section 1: Installation of Apache HTTPD on Linux machines 1 & 2
Follow the below steps to install the Apache HTTPD web server on both machines (in our case it is an Ubuntu machine).
Step 1: Update the OS
Run the below command to update the OS.
sudo apt update -yIn the case of RHEL / CentOS machines, run the below command to update the OS.
sudo yum update -yStep 2: Install the Apache HTTPD web server
Run the below command to install the HTTPD web server.
sudo apt install apache2 -yIn the case of RHEL / CentOS machines, the installation command is,
sudo yum install httpd -yStep 3: Start the HTTPD web server
Run the below command to start the HTTPD web server.
sudo systemctl start apcahe2In the case of RHEL / CentOS machines, run the below command to start the Apache HTTPD web server.
sudo systemctl start httpdStep 4: Check the status of the HTTPD web server
Run the below command to check the status of the HTTPD web server.
systemctl status apache2In the case of RHEL / CentOS machines, run the below command to check the status of the Apache HTTPD web server.
systemctl status httpdSection 2: Deployment of sample web application (static)
In this section, we will deploy a sample static web application in the Apache HTTPD server (on both machines). It means we will deploy the same static web application on both servers (since we plan to implement load-balancing functionality using the HTTPD web server, for this we need to deploy at least 2 instances of the sample web application).
Follow the below steps on both machines.
Step 1: Create a New HTML Page Under /var/www
First, remove the existing default HTML pages. Run the below commands one by one.
cd /var/www/htmlNext,
sudo rm -rf *.htmlthen create a new index.html page,
sudo vi index.htmlTo make the work of the load balancer very clear and visible, we will create two different content web pages.
Copy the below content and paste it into the newly opened index.html file in server-1/ machine-1.
<h1>Hello World! I am from Server 1</h1>Copy the below content and paste it into the newly opened index.html file in server-2/ machine-2.
<h1>Hello World! I am from Server 2</h1>Finally, save the files.
Step 2: Reload the Apache HTTPD web server
Once we have added a new index.html page, we need to reload the web server to see the changes. Execute the below command to reload the Apache HTTPD web server.
sudo systemctl reload apache2In the case of RHEL / CentOS machines, run the below command to reload the Apache HTTPD web server.
sudo systemctl reload httpdStep 3: Validate the Deployed web app
In the previous step, we created a new static HTML web page. Now we need to validate it. By default, the Apache HTTPD web server runs on port 80. Make sure you have allowed inbound network connection to your machine over port 80.
To validate whether the newly deployed static web page is working properly or not, access this URL from any browser – http://your_machine_ip:80
(Please replace ‘your_machine_ip’ by your machine IP address)
Section 3: Installation of HAProxy
In this section, we will install HAProxy on another machine. This HAProxy will provide the High Availability functionality. Follow the below steps to install HAProxy.
Step 1: Update the OS
For Ubuntu,
sudo apt update -yFor RHEL / CentOS,
sudo yum update -yStep 2: Install HAProxy using the Package Manager
For ubuntu,
sudo apt install haproxy -yFor RHEL / CentOS,
sudo yum install haproxy -yStep 3: Start HAProxy and check the status
Run the below command to start HAProxy,
systemctl start haproxyTo check the status of HAProxy, run the below command.
systemctl status haproxySection 4: Configure HAProxy to Provide high-availability Functionality
In this section, we will configure haproxy to provide HA functionality.
Before moving forward, we need to know a few details regarding load balancing. Load balancing is done either on layer 4 or layer 7 of the OSI model.
- Use Layer 4 load balancing for Basic Traffic Distribution:
- Need to distribute traffic across multiple servers for High Availability (HA).
- Decisions are based on simple factors like port numbers or IP addresses.
- Focuses on speed and efficiency. (e.g., HAProxy for basic load balancing)
- Use Layer 7 load balancing for Smarter Routing:
- Need to distribute traffic based on content or user data (URLs, cookies).
- Want to optimize traffic for specific application functionalities?
- Requires more complex configuration but offers finer control. (e.g., Routing users to different servers based on their location)
Looking at our use case where we just want to perform basic load balancing to distribute the traffic between two backend servers, we will implement ‘layer 4 load balancing’.
Now, coming to the haproxy configuration (to work as a “layer 4 load balancer”), there are 3 blocks in the haproxy configuration.
- “
global” block – it is regarding the global configuration of haproxy. - “
defaults” block – it is regarding common default configurations like log, mode, etc. - “
frontend” block – it says how haproxy handles incoming requests, on which port it will listen, etc. - “
backend” block – it says regarding the backend server where haproxy needs to forward the traffic.
Below is the /etc/haproxy/haproxy.cfg file in our case,
#---------------------------------------------------------------------
# Global settings
#---------------------------------------------------------------------
global
    log         127.0.0.1 local2

    chroot      /var/lib/haproxy
    pidfile     /var/run/haproxy.pid
    maxconn     4000
    user        haproxy
    group       haproxy
    daemon

    # turn on stats unix socket
    stats socket /var/lib/haproxy/stats

    # utilize system-wide crypto-policies
    ssl-default-bind-ciphers PROFILE=SYSTEM
    ssl-default-server-ciphers PROFILE=SYSTEM

#---------------------------------------------------------------------
# common defaults that all the 'listen' and 'backend' sections will
#---------------------------------------------------------------------

defaults
    mode                    http
    log                     global
    option                  httplog
    option                  dontlognull
    option http-server-close
    option forwardfor       except 127.0.0.0/8
    option                  redispatch
    retries                 3
    timeout http-request    10s
    timeout queue           1m
    timeout connect         10s
    timeout client          1m
    timeout server          1m
    timeout http-keep-alive 10s
    timeout check           10s
    maxconn                 3000

#---------------------------------------------------------------------
# main frontend which proxys to the backends
#---------------------------------------------------------------------
frontend ft_app_server
    bind *:80
    default_backend bk_app_servers
        reqadd X-Forwarded-Proto:\ http

backend bk_app_servers
        server server1 25.159.237.135:80 check
        server server2 205.178.199.98:80 check
In the above configuration file,
- You need to change the
server1 IPandserver2 IP. - Also, verify the ports on which the web pages are running and on which port your haproxy server is listening.
Section 5: Validate the working HAProxy
In this section, we will validate the working of haproxy as a HA provider.
You can hit the below URL to validate it (Please replace ‘your_haproxy_machine_ip’ by your HAProxy machine IP address).
http://your_haproxy_machine_ip:80
If you keep on refreshing the browser, it will display the below outputs alternatively.


This is all about using Haproxy as an HA functionality provider.
Thank you.
If you are interested in learning DevOps, please have a look at the below articles, which will help you greatly.
- How to create ansible role for Java installation – a simple guide
- Kubernetes Series: Part 1 – Introduction to Kubernetes | Background of Kubernetes
- Kubernetes Series: Part 2 – Components of Kubernetes cluster | Kubernetes cluster in detail
- Kubernetes Series: Part 3 – What is Minikube and How to create a Kubernetes cluster (on Linux) using Minikube?
- Introduction to Ansible | High-Level Understanding of Ansible
- Basics of automation using Ansible | Automate any task
- 10 frequently used ansible modules with example
- Jenkins Pipeline as code – High-level information
- What is End-to-End Monitoring of any web application and Why do we need it?
- What is “Monitoring” in DevOps? Why do we need to Monitor App/DB servers, Transactions etc.?
- DevOps Engineer or Software Developer Engineer which is better for you?- Let’s discuss
- How To Be A Good DevOps Engineer?
- How to do git push, git pull, git add, git commit etc. with Bitbucket