
Last Updated on August 14, 2025 by cscontents
Introduction
First, let’s discuss the context.
We all know LLMs (Large Language Models), which are like a brain. These LLMs are trained Machine Learning models, and they are trained on a huge set of data. These LLM models are brilliant in general; they can help us in learning by asking questions.
But that data on which these models are trained is generic. These models don’t know about the specifics of our projects, systems, infrastructure, repositories, toolset, database, etc.
Now, there is a twist in the picture. An AI company named Anthropic built a solution that can work as a bridge between these super-intelligent LLMs and our systems, toolset, repositories, etc. And this solution is called Model Context Protocol (MCP).
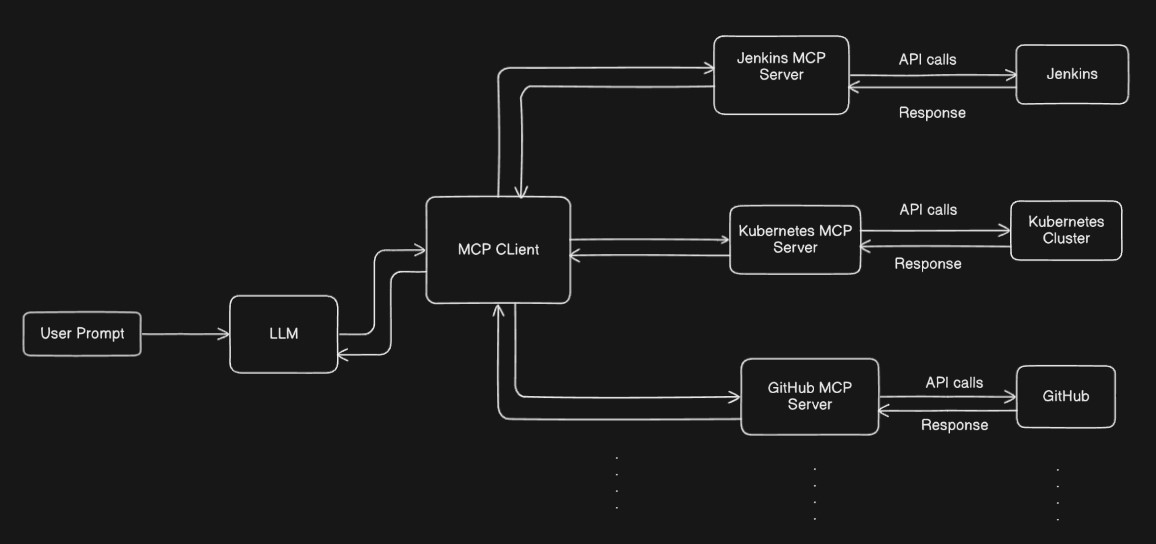
Components that are involved there –
- LLM (e.g., Gemini models, GPT models, etc.)
- MCP Client
- MCP Server
- Target tool or data source (e.g., Kubernetes cluster, GitHub, Jenkins, etc.)
Below is a high-level diagram that shows the concept.
Purpose of the MCP and MCP Client-Server Architecture
The purpose is clear that LLMs are intelligent, but to use this intelligence to manage the external toolsets, external systems, and external data sources, we need something to connect the LLMs with the target.
- It allows us to manage various tools, systems, and data sources by throwing prompts to the LLMs in plain human language.
- It gives us a secure way of accessing & managing our private tools, systems, data sources, etc., without exposing our sensitive information like secrets, API keys, passwords, etc. to the LLMs. Because LLM won’t have access to this sensitive information, we will provide this sensitive information to the MCP server, which will connect to the concerned tools, systems & data sources.
- And most importantly, on a high level, what it does is, it is abstracting away the tech stack layers. This setup allows everybody (tech & non-tech people) to know about the system, tools & data by asking questions to the LLMs in plain human language like English.
Connecting / Managing external Tools via LLM
In this section, we will see how to connect or integrate tools with LLMs via MCP (Client & Server).
Below is the tech stack we will be using.
- Cursor IDE – which has the MCP feature included. This IDE allows us to configure the MCP server through a JSON config file. And this IDE has an MCP client included within it.
- We will have only one MCP client (within Cursor IDE) and multiple MCP servers. Each tool has its own MCP server.
- In this article, we will take tools like Jenkins, Kubernetes Cluster, GitHub, and Atlassian tools (Jira & Confluence), which we will integrate with LLMs via MCP.
- Jenkins – we have a Jenkins instance up & running on a Linux machine.
- Kubernetes – we have a Kubernetes cluster up & running. This could be a small cluster, like minikube, just for testing purposes.
- GitHub – we have a GitHub account created.
- Jira & Confluence – we have an Atlassian account created.
Connecting or Integrating Jenkins MCP Server with LLMs
Follow the steps below.
Step 1: Collect Jenkins-related info
Below set of information below you need (please fill in similar info from your setup). You should have a Jenkins instance up & running.
- Jenkins URL: http://18.89.156.201:8080
- For a Jenkins user, create a Jenkins API Key.
- Jenkins User: jenkins
- API Key: **********************************
Step 2: Install Packages
- Install Cursor IDE
- Install Python on your machine where the Cursor IDE is installed.
- Install the “uv” Python package by running the command below.
pip install uv- Install the mcp-jenkins package by running the command below.
pip install mcp-jenkinsStep 3: Configure Jenkins MCP Server
In Cursor, follow the path below.
Settings -> Tools & Integration -> mcp.json
{
    "mcpServers": {
      "mcp-jenkins": {
        "command": "uvx",
        "args": [
          "mcp-jenkins",
          "--jenkins-url=http://18.89.156.201:8080",
          "--jenkins-username=your-jenkins-user",
          "--jenkins-password=your-api-token"
        ]
      }
     }
    }
And save this file.
Step 4: Restart Cursor
After adding the MCP server details in the mcp.json file and saving the file, we need to close the Cursor IDE and open it again.
Step 5: Validation
Once you open the Cursor IDE, go to the path below.
Settings -> Tools & Integration
The tool we added would be shown & check whether it is showing a green colour, or orange colour, or a red colour.
- Green Colour means – all the tools are available to the MCP server.
- Orange Colour means – it is loading the tools.
- Red Colour means – it is not able to connect. In this case, we need to check & think what could be the possible issue in the MCP client-server connection.
Step 6: Test it by giving a prompt
In the cursor, you can open the chat panel by pressing ‘CTRL + L’
There, you keep the “Agent” mode and throw a prompt like below.
Can you list the Jenkins jobs?If it is responding correctly, then we are good.
Reference
Jenkins MCP server repository: https://github.com/lanbaoshen/mcp-jenkins
(Follow the README.md file of the above repository)
Connecting or Integrating Kubernetes MCP Server with LLMs
Follow the steps below.
Step 1: Collect the kubeconfig file
Every Kubernetes cluster has a kubeconfig file. You can find it inside the .kube folder. Please copy the file or copy the content of the file and save it locally.
Step 2: Install packages
- We need to have the Cursor IDE installed.
- Python should be installed on our machine where Cursor is installed.
- Install np & mcp-server-kubernetes packages.
pip install nppip install mcp-server-kubernetesStep 3: Configure Kubernetes MCP Server
In Cursor, follow the path below.
Settings -> Tools & Integration -> mcp.json
{
  "mcpServers": {
      "kubernetes": {
         "command": "npx",
         "args": ["mcp-server-kubernetes"],
         "env": {
             "KUBECONFIG_PATH": "C:/Users/demo/.kube/config"
           }
       }
     }
  }
Step 4: Restart Cursor
After adding the MCP server details in the mcp.json file and saving the file, we need to close the Cursor IDE and open it again.
Step 5: Validation
Once you open the Cursor IDE, go to the path below.
Settings -> Tools & Integration
The tool we added would be shown & check whether it is showing a green colour, or orange colour, or a red colour.
- Green Colour means – all the tools are available to the MCP server.
- Orange Colour means – it is loading the tools.
- Red Colour means – it is not able to connect. In this case, we need to check & think what could be the possible issue in the MCP client-server connection.
Step 6: Test it by giving a prompt
In the cursor, you can open the chat panel by pressing ‘CTRL + L’
There, you keep the “Agent” mode and throw a prompt like below.
Can you get the running pods under the default namespace?If it is responding correctly, then we are good.
Reference
K8s MCP Server – https://github.com/Flux159/mcp-server-kubernetes
How to supply the Kubeconfig file – https://github.com/Flux159/mcp-server-kubernetes/blob/main/ADVANCED_README.md
Connecting or Integrating GitHub MCP Server with LLMs
Follow the steps below.
Step 1: Collect the GitHub Account Info
- GitHub Username: This won’t be used in config. But keep this handy, we may need to provide this info to LLMs while asking questions.
- GitHub PAT token: Create a PAT token
Step 2: Configure GitHub MCP Server
In Cursor, follow the path below.
Settings -> Tools & Integration -> mcp.json
{
  "mcpServers": {
     "github": {
      "url": "https://api.githubcopilot.com/mcp/",
      "headers": {
        "Authorization": "Bearer you-PAT-token"
      }
    }
  }
}
Here, the MCP server will run remotely.
Step 3: Restart Cursor
After adding the MCP server details in the mcp.json file and saving the file, we need to close the Cursor IDE and open it again.
Step 4: Validation
Once you open the Cursor IDE, go to the path below.
Settings -> Tools & Integration
The tool we added would be shown & check whether it is showing a green colour, or orange colour, or a red colour.
- Green Colour means – all the tools are available to the MCP server.
- Orange Colour means – it is loading the tools.
- Red Colour means – it is not able to connect. In this case, we need to check & think what could be the possible issue in the MCP client-server connection.
Step 5: Test it by giving a prompt
In the cursor, you can open the chat panel by pressing ‘CTRL + L’
There, you keep the “Agent” mode and throw a prompt like below.
Can you create a repository with a Hello World Java-based application with Dockerfile, Deployment & Service manifest file to deploy it in an AKS cluster? Keep the Service type as a load balancer?If it is responding correctly, then we are good.
Reference
GitHub MCP server: https://github.com/github/github-mcp-server
Connecting or Integrating Atlassian MCP Server with LLMs
Follow the steps below.
Step 1: Know the Prerequisites
As per the document, it requires a browser that supports OAuth 2.0
It will try to open a browser, and we need to allow it. From there, it will access the concerned Jira account.
Step 2: Configure Atlassian MCP Server
In Cursor, follow the path below.
Settings -> Tools & Integration -> mcp.json
{
   "mcpServers": {
      "atlassian-mcp-server": {
         "url": "https://mcp.atlassian.com/v1/sse",
        "type": "http"
    }
  }
}
Here, the MCP server will run remotely.
Step 3: Restart Cursor
After adding the MCP server details in the mcp.json file and saving the file, we need to close the Cursor IDE and open it again.
Step 4: Validation
Once you open the Cursor IDE, go to the path below.
Settings -> Tools & Integration
The tool we added would be shown & check whether it is showing a green colour, or orange colour, or a red colour.
- Green Colour means – all the tools are available to the MCP server.
- Orange Colour means – it is loading the tools.
- Red Colour means – it is not able to connect. In this case, we need to check & think what could be the possible issue in the MCP client-server connection.
Step 5: Test it by giving a prompt
In the cursor, you can open the chat panel by pressing ‘CTRL + L’
There, you keep the “Agent” mode and throw a prompt like below.
Can you list the in-progress Jira tickets?If it is responding correctly, then we are good.
Reference
- Jira MCP – https://support.atlassian.com/rovo/docs/setting-up-ides/
- https://www.atlassian.com/blog/announcements/remote-mcp-server
- https://support.atlassian.com/rovo/docs/getting-started-with-the-atlassian-remote-mcp-server/
Alternative to running the Remote Atlassian MCP server – Using Docker
If the remote Atlassian MCP server is not connecting for you, then you can run another version of the Atlassian MCP server as a Docker container.
Step 1: Install Docker
Install Docker on your machine. If you want to use a remote Linux machine, that is also fine.
Step 2: Run the container
The example below is only for Jira.
docker run --rm -i \
  -p 85:8080 \
  -e "JIRA_URL=https://you-domain.atlassian.net" \
  -e "JIRA_USERNAME=your-email" \
  -e "JIRA_API_TOKEN=your-jira-api-token" \
  ghcr.io/sooperset/mcp-atlassian:latest \
  --transport sse --port 8080 -vv
Here, we are exposing the MCP server through port 85 (this port should be open at the network level, like in a security group, etc). And inside the container, the server is listening on port 8080.
Step 3: Configure Jira MCP server
In Cursor, follow the path below.
Settings -> Tools & Integration -> mcp.json
{
  "mcpServers": {
    "mcp-atlassian": {
        "url": "http://docker-host-ip:85/sse"
      }
   }
}
And save the file.
Step 3: Restart Cursor
After adding the MCP server details in the mcp.json file and saving the file, we need to close the Cursor IDE and open it again.
Step 4: Validation
Once you open the Cursor IDE, go to the path below.
Settings -> Tools & Integration
The tool we added would be shown & check whether it is showing a green colour, or orange colour, or a red colour.
- Green Colour means – all the tools are available to the MCP server.
- Orange Colour means – it is loading the tools.
- Red Colour means – it is not able to connect. In this case, we need to check & think what could be the possible issue in the MCP client-server connection.
Step 5: Test it by giving a prompt
In the cursor, you can open the chat panel by pressing ‘CTRL + L’
There, you keep the “Agent” mode and throw a prompt like below.
Can you list the in-progress Jira tickets?If it is responding correctly, then we are good.
Reference
Repo – https://github.com/sooperset/mcp-atlassian
README.md file – https://github.com/sooperset/mcp-atlassian/blob/main/README.md
Thank you.
If you are interested in learning DevOps, please have a look at the articles below, which you might find informative.
- Introduction to Ansible | High-Level Understanding of Ansible
- Basics of automation using Ansible | Automate any task
- 10 frequently used Ansible modules with example
- Jenkins Pipeline as code – High-level information
- What is End-to-End Monitoring of any web application and Why do we need it?
- DevOps Engineer or Software Developer Engineer which is better for you?- Let’s discuss
- How To Be A Good DevOps Engineer?
- How to do git push, git pull, git add, git commit, etc. with Bitbucket